Showing posts with label Video Tutorial. Show all posts

Wednesday, November 11, 2015

Tom the Turkey Table Decorations With Cheery Lynn Designs


Hi everyone! It's Lisa back today sharing a new project and video tutorial on my Tom the Turkey Table Decorations for Cheery Lynn Designs. I wanted to make some cute little turkeys for my table this upcoming Thanksgiving. My brother has five children and I thought they would like them on their plates and then they can take them home. They are about 4 inches tall and 3 inches wide. Super easy to make and it gives your Thanksgiving table a bit of color. These were also inspired by this week's challenge "Autumn Colors"


The papers I used are only one sided patterned papers for my rosettes/feathers, but you can use double sided patterned papers to give your turkey a more fuller feathered look. I also added little wiggly eyes on the kraft turkey head, just to make them more playful for the children.


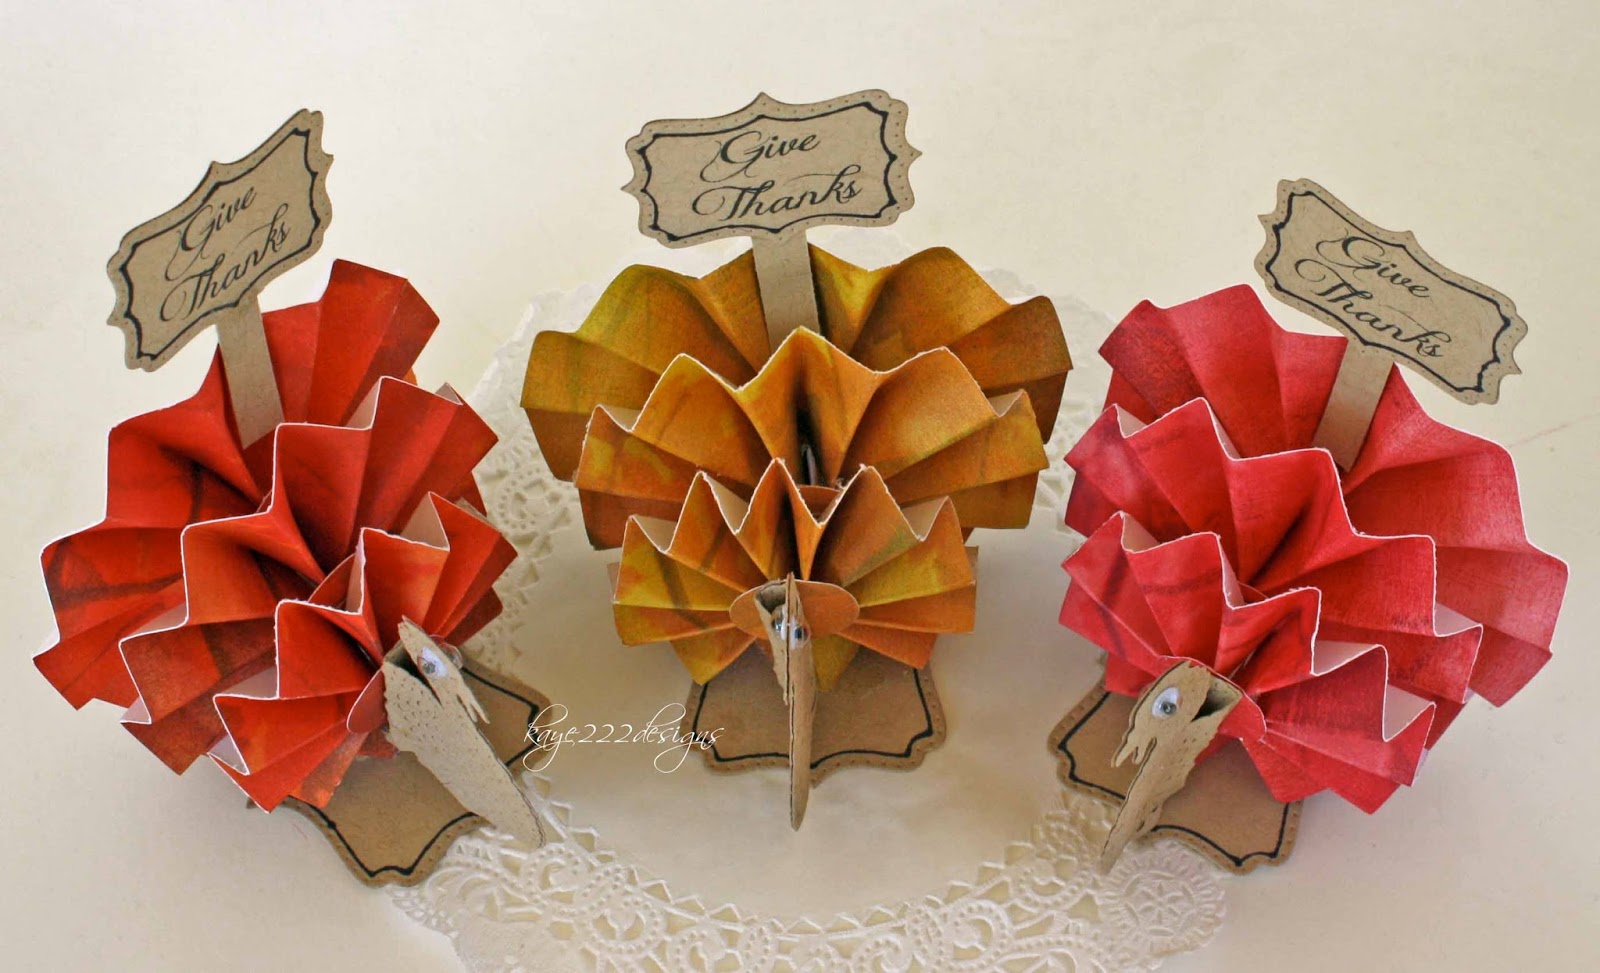
Here you can see the Tom the Turkey's from looking down...They really are fun to make....
Here is the quick video tutorial on how I made them: 
Thanks for watching! 


Cheery Lynn Designs Dies Used:


Be sure to check out this week's challenge "Autumn Colors" for your chance to win $20 from the Cheery Lynn Designs Store.
Have a great day! 
Hugs, Lisa

Sunday, November 1, 2015

Halloween Explosion Box

Hi!
I sure hope everyone had a wonderful and safe Halloween this year! I know I'm a day late, but I wanted to share with you this Halloween Explosion Box that I started to make the other day and finished it up this morning. I used all Cheery Lynn Designs die cuts and had a blast making it!  


I am totally in LOVE with the Ornamental Fence! 

My son helped me with the dimensions for the top of the haunted house. Thx son! 


I kept the colors to the normal Halloween colors, Black, White, Grey, Orange and Green.


A peek inside....Simple but I plan on using photos on all the pieces inside. 


Here is a super quick video too! 
Thanks for watching! 


Have a great day! 
Hugs Lisa

Thursday, October 15, 2015

October New Release / Life's A Beach With Cheery Lynn Designs

Hi everyone! Welcome back to my blog and today Im sharing with you a Memory Book from Cheery Lynn Designs with lots of new fun dies! (and of course some classics too) I LOVE the Big "Life's A Beach" sign and it is not only beautiful but also so detailed! 


A side view of the memory book. I added burlap and lots of fun ribbons. 


One more top view. You can see a bit of the pop dots underneath.


A quick sneak peek on the inside.... Using more of the New Release called "Surf's Up Set"


Here is a You Tube Video to watch! Enjoy! 


Thanks for stopping by and be sure to check out more fun projects with the DT and the New October Release at Cheery Lynn Designs Blog. Be sure to get some fun new dies from Cherry Lynn Designs Store for your collection too! 
Have a great day! 
Hugs, Lisa 

Sunday, February 22, 2015

Shabby Chic Shaker Card

Happy Sunday! 
Today, I'm sharing with you a shabby chic shaker card. I have made one shaker card prior to this one, but I will share it with you at a later time. shhh...my first shaker card is for a contest coming soon. :) This card is for this week's Anything Goes at Cheery Lynn Designs # 173. 
I was planning to make a purple card since I don't use that color very often, however I ended up using pinks, creams, and browns. All the diecuts are from Cheery Lynn and I used a MS punch along the edge of the cream cardstock. Did you notice the big brown bow? I finally figured out how to make this gorgeous double bows that I have admired from soooo many cardmakers. Yay!


I used a bit of lace for the top of the window for a curtain. The tiny beads are in each separate window. I used white foam to raise the card up and clear transparency film plus cardstock on top for the window.


Here is a close up of the flowers. I used Gala Glitz in brown for the centers. The stamp "thanks"I used brown chalk and fussy cut out. Then I curled it a bit with my fingers. The beautiful stamps are from Just Rite. I love making lots of thank you cards because you never know when you need one right away! 


Loving the double bow :) 
I also added pink pearls to the top of the window and one in each corner of the punched corners.


An inside view of the card and I even added another flower after I took this picture. 
You can see it on my video tutorial below...


Cheery Lynn Diecuts Used:

FRM141 Window A
SF-2 Stacker Flowers #2
B241 Rose Leaf Strip
B178 Flourish Leaf Strip
B152 Miniature Rose 

Here is a new tutorial using miniature roses to make different kinds of flowers.
It was a request by Lizzy C.  
Enjoy and thanks for watching! 


Have a great day! 
Hugs 
Lisa

Tuesday, February 3, 2015

Cheery Lynn Designs DT Call

Hello my scrappy friends!
Tonight, Im sharing with you another brand new card made for Cheery Lynn Designs DT Call! Im so excited to try to be part of the team. Every card convention here in Arizona, Im able to see all the beautiful diecuts from Cheery Lynn. I will tell you that for those of you that dont have any yet, it is a for sure must have for all your cardmaking and scrapbooking layouts. They are so delicate and the  telfon coating makes the diecut cut your paper out perfect everytime! So this is my entry using 6 beautiful diecuts from Cheery Lynn. I love the color green when it comes to cards because it feels so warm and soothing to me. I guess you can say like nature. So that was the color that called to me tonight for my entry. Wish me luck! 


Here is a side view and as you can see the inside I used the border carnivale and I also used it in green on the left side of the card in front. The butterfly I diecut out and then I fussy cut the green patterned paper for the bottom to give it more of a 3D effect. (PS I had these before the angel wings)  I also did the same to the birdcage. These papers I have used in the past and these are the leftovers. Im a little sad now....The Italian Flourish happens to be one of my personal favorites. I just cut it in half and placed half on top of the card and the other half on the bottom of the card. You know how you image a card to look like and then it takes a complete turn around? Well, that is what happened here....but im happy with the results. :)


Here is the 3D view as you can see the flowers, the butterfly, the birds, the birdcage, the ribbon and even my favorite new little stamp "just a little note" pops off the card. It is still easy to mail in a larger bubble envelope which is how I mail mine out.  It also protects your project very well across the states.


A closer view of the butterfly, leaves and roses. I had some leftover pastel green pearls and it was perfect to add to my butterfly and birdcage. 


Even a bit closer.... just love the miniature roses for many of my cards. Hoping to get the larger rose diecuts in the near future! 


 Cheery Lynn Diecuts Used:

and last but not least....

Here is a YouTube that I just finished on how I make my miniature roses.
Been a long time since I last made a video so be kind....thanks soooo much! 
Enjoy and Thanks for Watching!


Have a great day! 
Hugs...Lisa

Wednesday, June 19, 2013

Shabby Chic Mini Album *You Tube*

Hi everyone! It has been a really super long time since I last posted anything on my blog...so sorry! I have had some family issues that needed attention and yet I have been making this mini album in between times to destress a bit...I finally finished this shabby chic mini album that I wanted to make...There were 3 albums on my list to make...1. halloween 2. vintage. and 3 shabby chic. Now that I have finished this last one I may move back to cards and layout that I love so much too! 
So here i the front of the album it is a 7 x 7 inch by 5 inches thick in blues and white.


Lots of flowers, lace and pearls with cut little tags and mini albums inside. Most of the flowers are from Recollections with some petaloo and prima flowers too. 


Here are a few sneak peeks....


The page on the left is my favorite....


So here is the You Tube Video....
Thanks so much for watching!!
Hugs
Lisa


Monday, May 20, 2013

Vintage Mini Album *You Tube*

Hi everyone... tonight Im sharing with you my new Vintage Mini Album that I recently finished this weekend. I have lots of tiny mini's inside that was inspired by several mini albums out there. Thank you soooo much!! So many creative minds.... :) I wanted to make a new vintage mini album using lots of browns, golds and creams. I used many of my leftover flowers and the paper I bought at Walmart for $5.00...It is from Colorbok. This is a 6 x 6 paper bag mini album. I just use regular paper bags because I have so many in the house from when my children were younger....long time ago! lol
So here is the front cover using lots of flowers and a Tim Holtz metal piece. 


Here is a side view using burlap on the spine....under it is cardstock reinforced a few times. 


A few sneak peeks....the front inside page....


A few pages later....


Here is a new You Tube video too! 
Thanks for watching!


Have a great week!
Hugs

Saturday, May 4, 2013

Vintage Halloween Mini Album *First You Tube Video*

Hello everyone! I know it has been a while since I last posted. Sorry about that....I made this Vintage Halloween Mini Album last weekend and I really wanted to make my very first video tutorial to go with it...let me tell you it sure was a learning experience. I bought a tripod and then trying to talk somewhat like a normal person was tricky for me too. I need to work on my lighting more but for my first video, it was not as bad as a thought? So here is a photo of the cover of my mini....lots of black orange and creams. 


Here is a couple of sneak peaks.... 


Lots of fun tags and embellishments....


So here it goes the premiere of my first You Tube Video....hope you enjoy! 


Thanks for watching! 
xoxo
Lisa