Showing posts with label Tutorial. Show all posts

Tuesday, February 3, 2015

Cheery Lynn Designs DT Call

Hello my scrappy friends!
Tonight, Im sharing with you another brand new card made for Cheery Lynn Designs DT Call! Im so excited to try to be part of the team. Every card convention here in Arizona, Im able to see all the beautiful diecuts from Cheery Lynn. I will tell you that for those of you that dont have any yet, it is a for sure must have for all your cardmaking and scrapbooking layouts. They are so delicate and the  telfon coating makes the diecut cut your paper out perfect everytime! So this is my entry using 6 beautiful diecuts from Cheery Lynn. I love the color green when it comes to cards because it feels so warm and soothing to me. I guess you can say like nature. So that was the color that called to me tonight for my entry. Wish me luck! 


Here is a side view and as you can see the inside I used the border carnivale and I also used it in green on the left side of the card in front. The butterfly I diecut out and then I fussy cut the green patterned paper for the bottom to give it more of a 3D effect. (PS I had these before the angel wings)  I also did the same to the birdcage. These papers I have used in the past and these are the leftovers. Im a little sad now....The Italian Flourish happens to be one of my personal favorites. I just cut it in half and placed half on top of the card and the other half on the bottom of the card. You know how you image a card to look like and then it takes a complete turn around? Well, that is what happened here....but im happy with the results. :)


Here is the 3D view as you can see the flowers, the butterfly, the birds, the birdcage, the ribbon and even my favorite new little stamp "just a little note" pops off the card. It is still easy to mail in a larger bubble envelope which is how I mail mine out.  It also protects your project very well across the states.


A closer view of the butterfly, leaves and roses. I had some leftover pastel green pearls and it was perfect to add to my butterfly and birdcage. 


Even a bit closer.... just love the miniature roses for many of my cards. Hoping to get the larger rose diecuts in the near future! 


 Cheery Lynn Diecuts Used:

and last but not least....

Here is a YouTube that I just finished on how I make my miniature roses.
Been a long time since I last made a video so be kind....thanks soooo much! 
Enjoy and Thanks for Watching!


Have a great day! 
Hugs...Lisa

Thursday, February 21, 2013

Blue Jeans *Donna Salazar*

Hi my scrappy friends!
Its Lisa today sharing a tutorial on how to make felt roses. It really is easy using Donna's "Bitty Blossoms". Felt flowers seem to in lately and buying your own felt makes it not only convenient but also super cheap! Here is my layout using the amazing Family Jeans Paper Collection. This is a photo of my little Roxy and in her blue jeans.


Here is a closer view of the blue felt roses. 


First, take a piece of felt and cut it to fit your diecut machine. 
I bought my felt at Michael's full price for 20 cents! lol


Using the largest of Bitty Blossoms...Run it through the diecut machine a few times. 
If it sticks a bit just cut edges with scissors. You should see the lines. 


The biggest part of making these flowers is applying the glue all the way around before you start rolling them. I use a fast drying glue like Art Glitter-Clear. The roll the edges like you do with paper, I also use a wooden stick in the center and then pull it out when Im done.


Ta Da! Your felt flower is done! 


Another view of the felt flower and layering of a yellow rose using 3 layers. 


Gotta LOVE the chippie letters in this "Family Jeans" collection.


An angled view of the dimensions of the flowers and pop dots throughout.


Hope you enjoyed and start making your own felt flowers too...
I just love when I can save some money to spend it somewhere else. :)
Have a great day! 
xoxo

Products Used:

GCD Studios-Family Jeans Collection
GCD Studios- Family Jeans- Chipboard Alphas


Saturday, January 19, 2013

Cheer Up & Smile *Donna Salazar*

Hello my scrappy friends! 
Its Lisa once more this month with a easy tutorial on how I get my sentiments on my cards and layouts. 
I really don't like my handwriting that much because it is so BIG and loopy
...so I almost always used Microsoft for Word. It gives you sooo many more options of handwriting's. 
If you never have tried it before here is your chance to start. :)
This is a 5 x 6 inch card using lots of diecuts, stamps and New papers by Donna Salazar.
I chose yellow because it reminds me of the sun and it seems to be a cheerful color when you are down.
The awesome diecuts and stamps from "snapshot" makes you want to smile right???


Here is the inside...I don't do many insides ahead of time....but I just love this quote from the famous
Scarlett O'Hara...one of my favorite classic movies. 


So lets get started!
First, pick out the diecut you are going to use. You can use any diecut but for my card today I used "snapshot's" little quote bubbles. You must first cut out the diecut and measure the size with a ruler so you know how big you can make your fonts.


Next, on the computer, pick out font you want to use and look at the size using the ruler bar on top. 
You can also change your color to match your theme too. I love black for most of my sentiments, but the choice is totally up to you! See what I mean about options? lol


After you are happy with your font and size go ahead and print it up on the computer paper.


 OK....now using REMOVABLE adhesive tape place your diecut on top of your font.
I use the daylight or a lamp to see it through for exact placement. 
*Tip*
If you made you font too large or too small...no worries. 
You simple remove the diecut and print it up again until you are happy :)


Once you are satisfied with your placement place it back through the computer 
and it should come out like this. 


As you can see the ink should not be smeared or come through the other paper. 
Remove the diecuts and place on your card or layout. 
I tend to use pop dots behind mine, but once again it is up to you....
so many options...oh my! lol


Here is a closer view of your sentiments that make you look like a pro! 


Thanks for stopping by and I hope you try this tutorial out if you haven't tried it yet....
WARNING!!!
It is addicting and you may never use your handwriting again....lol
Hugs
xoxo

Products Used


Wednesday, December 12, 2012

Heartfelt Wednesday's *Poinsettia Candy Bag*

Sharing with you today a new candy bag for Heartfelt Creations this week.
I made some similar ones for the Thanksgiving season and I thought why not make some for 
Christmas too. 
Very simple to make and you can view the full tutorial here
Just change your decorations. 
Love the poinsettias on this bag.


Here you can see the back with the sentiment. 
I used an old HC stap. 
I just love the font. 


Well a short post today...getting ready for the holiday season just around the corner.
Be sure to stop by Heartfelt Creations Blog to see more projects this week by our fabulous DT.
Have a great week!
Hugs


Wednesday, December 5, 2012

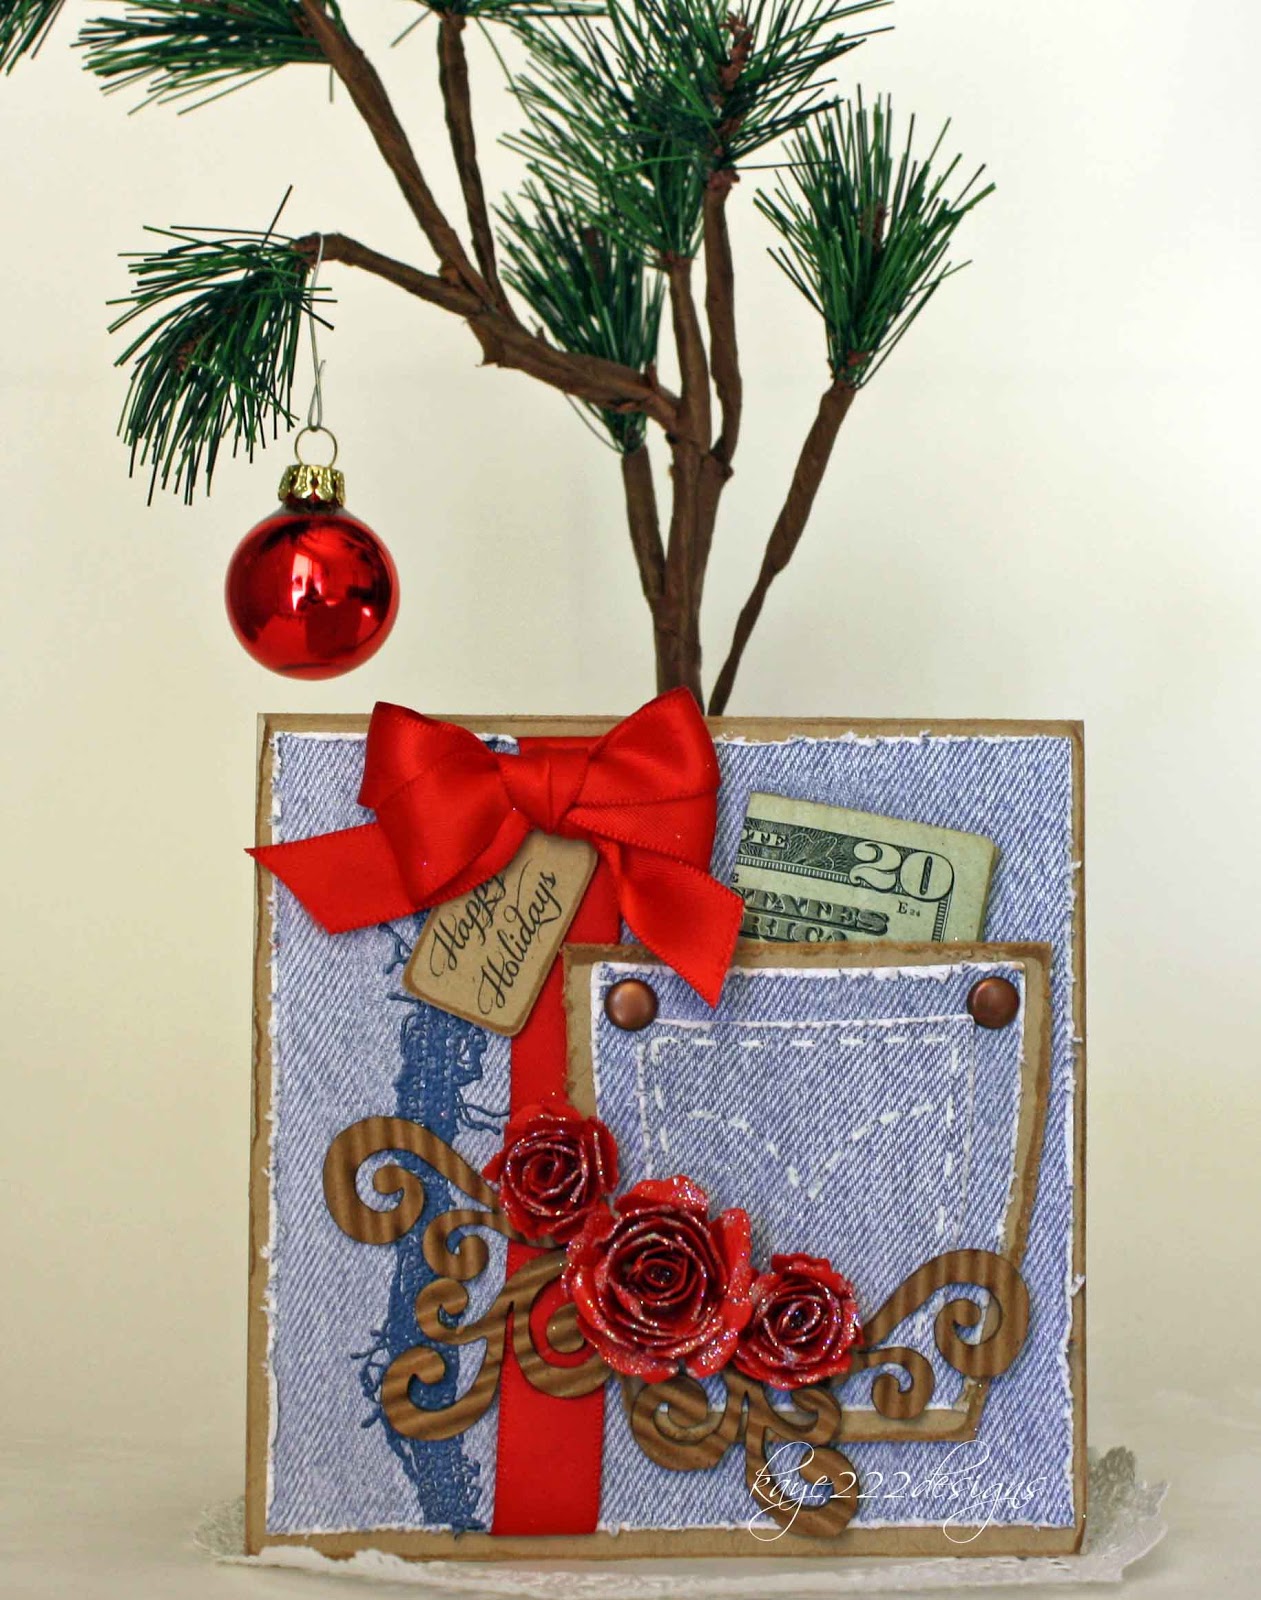
Christmas Blue Jean Gift Card * Donna Salazar*

Hello my scrappy friends! 
It's Lisa back again with a new tutorial gift card perfect for this holiday season or anytime of the year.
This gift card is great for teenagers and those of us who love blue jeans, 
but also you can write an entire sentiment inside too because it is a regular card. 
So here is the finished card, I love red but you can use your favorite colors 
since blue jeans go with everything. :)


A little closer view of the "jean pocket" and fabulous "bitty blossoms" roses.


So lets get started...should take about 30 minutes...yep that's it!
First, cut a piece of kraft cardstock 5 x 10 inches long then fold in half at 5 inches.


Cut a piece of 4.75 x 4.75 inches "storybook paper" and stamp the "tattered" with "denim mix'd media inx and demin embossing power" dry with embossing tool. *It is 1 inch on the left.*


Diecut 2 smallest "pocket and swirls"


Distress all 3 pieces with your "zutter"
I also doodled with a white signo pen the lines on the smaller "pocket"
You can also sew on it if you like.


Using the NEW "Chox" in driftwood chalk the edges of the card.
Cut a piece of kraft to place behind the pocket, distress with the "zutter" and chalk edges.
Add rustic brads to match the kraft in the corners.


Next choose your ribbon color and wrap around the "storybook paper" before 
you glue it down to your base of the card.
Add small pop dots behind the "pocket"


Make 2 medium and 1 large "bitty blossoms" and glitter using "fairy dust glitter"
pralines and cream and "glue gloss"


Glue down as shown here and add the "hand drawn corrugated swirls"
Make a tag with sentiment in kraft and chalk edges with "chox" driftwood. 
Add a matching bow on the top.
 Don't forget to place a gift card or $$$ in the pocket. :)


Your gift card is ready to go with lots of love.
Hope you were inspired to make yours soon!
Have a great holiday season.
xoxo

Products Used:


Monday, November 19, 2012

Thanksgiving "Treats" *Donna Salazar*

Hello my scrappy friends! 
Its Lisa back with a new tutorial making these cute little treat bags for the holiday season. 
I guess they are great for any time of the year too. 
I was thinking about Thanksgiving in a few days and how I'm so Thankful for my "family"!
I was recently at a card convention when I seen some adorable little candy bags and I thought I don't need to buy the pre-made ones? I can just make them out of cardstock easily. :)
I was also thinking they would be great for name place cards on the table too. 
Here are 2 different colors and using Donna's fabulous new "pockets and swirls" diecuts.


Here is the one we will make today, for the thanksgiving holiday.


First, you need a piece of white cardstock 3 x 9 inches and score it at 4 & 5 inches.


Next use a punch on each edge. 
Tip
*I centered it using the lines of the punch then went out both ways.* 


Then fold on score lines and using a hole punch 
make 2 holes up on the top through both sides at once.


Using Donna's blue jean paper from "storybook"
diecut the 2 smallest pockets from "pockets and swirls"


Next distress the edges with your "zutter" for a cool jean look!
I also doodled on the lines of the smaller pocket with a white pen. 


Stamp on white cardstock with "mixd media inx"-black the word "family"
from the "banner and words" stamp collection.
I fussy cut if out and used pop dots.


Glue down the pocket and add small punches of leaves. 


In the inside add a tiny bag *jewelry size*  
punch again through the bag...dont forget your goodies!


Place ribbon through holes and give yourself some length for a bow.

   
Place ribbon through the front and add a bit of white lace to the top.
Your "treat bag" is ready for this holiday season!


Hope you will give them a try soon! 
They are really great as gifts, treats for school or just because! 
Hope you have a great Thanksgiving with friends, family and loved ones! 
xoxo

Products Used: