Wednesday, August 29, 2012

Heartfelt Wednesday's...More Holiday Cards

Hi welcome back to another Heartfelt Wednesday
Today, I'm sharing with you 2 new cards! I usually make several layouts for the DT, however with these 2 particular stamps this month...they really need to be shown off. There is so much details and I didn't want it to get lost behind a photo or as a background.
I am NOT really good at  coloring...although I really try super hard to be...but I don't have the skill that many of my colleagues have over at HC....someday I hope. Meanwhile, all the coloring here was done using distressing inks from Tim Holtz and a watercolor brush. It was my VERY FIRST time trying that technique out. I add some flower soft and a little bit of shine using my jelly roll pen. 


Here you can see the little bit of pop off the title and the corner fixture. It is not too much and great for mailing, this coming holiday! 


So, here is my second card that I made this week for HC. It is all silver! The color was inspired by my sister who loves silvers for Christmas. Pretty easy to make and fast too! 


 Here you can see the 3D flowers and awesome ribbon.... have been experimenting with making triple loops...actually I think this one has 4??? lol


For all instructions and supplies check out the Heartfelt Creations Blog and don't forget to check out more fabulous designs from out DT.
Have a great Wednesday!
Hugs! 

Sunday, August 26, 2012

We're "Perfect" Together - Reese Peanut Butter Cups *SOUS*

Hello again today! Yes it is still Sunday...lol 
This was a super duper fast card that I made in just a few minutes because the cricut does all the work! 
Love it! I made a card for the first "Stuck On U Sketches"and well, I checked out the latest sketch and as soon as I seen it... "Reese Peanut Butter Cups" popped into my head! Chocolate one more time....last time chocolate popped in my head I couldn't stop singing "Pure Imagination" from Willy Wonka. Hope that doesn't happen again....please please....NO!
So here is the sketch made by Leah Schaeffer...so fun...thanks :)


Here is my Reese Peanut Butter Cup card....as you can see there are many candies..YUM...like who can only eat one? I originally was going to leave off the bites but i ended up using them. There is no patterned paper used so it is really fast and easy to make. The card is a 5 x 6 base in kraft cardstock and the scalloped circles in dark brown are 1.5 inches with 1.25 inch kraft circles in the center. I chalked the edges up with brown chalk a bit before gluing them together. 


The font is called "buttarcup" and I found it on free fonts online. I used the "ribbon banners" for the title in white cardstock. I was going to use "You're Perfect" but then I thought of the slogan for the candy and it is about chocolate and peanut butter...hence the new title "We're Perfect Together"


All the candy has pop dots under them for a 3D look and some yellow ribbon made this card complete in less than 10 minutes...


Hope the rest of your day is "SWEET"!
Thanks for stopping by again...Love hearing from you!
Hugs!

Midnight Shadows

Happy Sunday!
Last night, I really felt like making a Halloween card. I bought some really cool vintage Halloween paper about a year ago and I finally broke it open. :)
I wanted to make it vintage looking using creams and blacks. So then I remembered that I found on sale last year these really cool chipboard pieces from Martha Stewart for Halloween. They are called 


I made a black bow and added a yellow crystal brad in the center. The font for the title midnight shadows is called "midnight shadows" lol I thought I would add a little moon in the background and it is just a 1 inch circle chalked with distressed yellow ink and black chalk. 


The card is not overly popped up like I usually make, just a little bit. I used "bella rose" diecut for the swirls and martha stewart punch for the "iron fence".  


Have a spookacular day! 
Hugs! 

Saturday, August 25, 2012

Back To School

So today, I was on a total scraplifting mood for a back to school card. All my children are in college and one has already graduated college...yikes, Im gettting old! While I was browsing on pinterest a few days back I seen this AMAZING card made by Carrie Gaskin...I loved it so much I just had to lift it! I think it totally screams "Back to School" and even though I don't have a person to give it to I wanted to play with some fun colors... :) You can see Carrie's original card here. Thanks Carrie! 


I did change the numbers to letters and added more buttons. The letters are made with my cricut using "schoolbook plantin". I also made the schoolbook paper with white cardstock and a black marker with tiny punch holes. 


The pencil made from a popsicle stick was also a scraplift idea from Tracy F. at sb.com. 
Pure GENIUS! 
I colored the pencil with smooches and a black copic marker. 


Hope you are inspired as much as I was today...have a great day! 
Hugs! 

Wednesday, August 22, 2012

Heartfelt Wednesday's "Jesus the Reason..."

Welcome back to another Heartfelt Wednesday using more of the "Ornamental Light" collection.
Last week I used lots of the blues in the collection and this week I wanted to use my favorite color...RED! This card was super fast to make..it only took about 15 minutes. 
It is perfect for making in mass quantities for this upcoming Christmas season. :)
Such a warm color and a beautiful warm sentiment to give to loved ones and friends.


The bling is from Want 2 Scrap...Donna Salazar'a sprocket pearls.


I made a triple looped bow in white satin and the flowers just pop up a little bit


Here are the instructions to make your own cards in just a a few minutes...it is never too early to start those holiday cards! 

Heartfelt Creations Supplies

Other Supplies
Bazzil & Recollections Cardstock, Want 2 Scrap Sprocket Pearls, Recollections Pop Dots, Staz-on Black Ink, Copic Marker, Glitter Smooch-Frost, Ribbon

Instructions
Card takes approximately 15 minutes to make. Base of card is 5 x 6 inches in white cardstock. Cut in red cardstock 4.5 x 5. 5 inches. Cut white cardstock 4.25 x 5.25 inches. Cut red poinsettia patterned paper from “frosty blanket paper” 4 x 5 inches. Place white satin ribbon around patterned paper and layer/glue all papers on base of card. Diecut 2 “Parisian motifs” in white cardstock, place pop dots in between pieces and turn slightly. Cut one circle in red cardstock 2.75 inches and one circle in white cardstock 2.5 inches. Stamp on white with “yuletide sentiments” in black. Glue 2 pieces together and add pearl bling around white edge of circle. Stamp 6 smallest of the “petite poinsettias” in black and diecut with “layered poinsettia” color inside with red copic marker and add glitter smooch. Glue 2 together and add pearls in centers, a total of 3 flowers. Tie a triple looped bow in white satin and add more pearls in center of bow. Place bow on bottom right corner and flowers as shown.

Be sure to stop by the HC Blog for more fabulous creations this week! 
Have a great day!
Hugs 

Monday, August 20, 2012

Shabby Chic Birthday

Hello scrappy friends! Today, is my daughter Roxanne's 20th birthday...her golden birthday right? 
The 20th on the 20th? Happy Birthday Baby! Well, I wanted to make her a beautiful card for her to remember me...for years to  pass...she loves vintage and blues & greens. I found these amazing 6 x 6 inch papers in small packs at Michael's a couple of weeks ago....they are shabby treasures and I just love the patterns! The super best part of the find was they were 25 cents! OMGosh!!! what a amazing deal! You cant even buy a piece of gum for that anymore! lol I also bought the little resin birdhouses that are from Recollections...there are 3 in a pack and they were on clearance for 99 cents...so I bought what they had...3 packs...Woo hoo! happy dance!
 They come in light brown and I just painted them white for my shabby chic theme.


The tiny roses are made with "bitty bloosoms" the middle size and the adorable birds that I just cant stop using are from Heartfelt Creations "brookside manor" with the matching diecut "garden romance" Since I have been on the button kick lately I decided to add some matching blue buttons too! 
For my past birthday in July, my sons bought me a fabulous giftcard for Hobby Lobby and well I bought more buttons and a lot more goodies coming soon! 


The white ribbon has a pearl string wrapped around it 3 times then glued down with 
glue dots and extra glue so it wont move. 


Thanks for stopping by my newest shabby chic birthday card!
Have a great week!
Hugs! 

Sunday, August 19, 2012

Girlie Grungy Art

Hello Grungy girlies! It's Lisa back today and I'm sharing with you a really grungy layout with a tutorial too! I usually don't make these types of layouts because I'm always afraid it will be a disaster! Meaning the colors wont come out right or the misting will be out of place? Anyone else have that fear? If so I can totally relate :) Let me tell you that once you give it a whirl, you will be in love too! My inspiration come from the famous Finnabair and her amazing artwork. By using Donna's fabulous products you can easily get the same look with no problem. So here is my grungy art layout using 3 different mists, 2 glitters and a lot more goodies from Donna! This is an older picture of Roxy and with that dark eye shadow it thought it would work really great with the look I was going for today. 


So lets get started....
First, pick out a piece of patterned paper from the Botanique Collection and cut a .25 inch all around the paper. Then distress edges with Zutter Distrezz It All. Layer over some plain cream cardstock and doodle on the edges some faux stitches


Next, place matted photo off to the left of the page and slightly down the middle. 
Stamp Donna's ruler over  the top of the photo and place doilies in opposite corners. 
Both Doilies are small ones and cut one in half...save for another project. :) I misted the doilies slightly ahead of time with Pralines & Cream" but you really dont have too because it will get covered later.


Next, make lots of paper flowers using Bitty Blossoms and Rose Creations in 2 different shades of blue and cream to match your background paper. Ink in brown the Sprockets from Want 2 Scrap.  There are 4 pieces in the pack, I torn apart the largest sprocket to get 6 pieces, but I only used 5 of them for this project. Be sure to save the largest piece for yet another project...


Place flowers and sprockets where ever you like, I also added buttons and metal fixtures.
Once you have it all glued down, place a piece of tissue paper over the main part of the photo. It is ok to leave a little bit of the edge of the photo showing to blend all the colors together. 
OK, here comes the grungy part! :) Just start misting in spots everywhere...


I chose Pralines & Cream first, then Sea Breeze, and finally topped off with Candle Glow.
There really is no special technique to mist, just started misting in spots until you like the colors.
(I actually went back and forth with colors until it was darker in some areas) 
You can then air dry it or speed it up a bit by using a embossing heating tool.
Once it is dry add some smooch glitz on the flowers and buttons.


Im sooooo sorry...I forgot to take an original picture while I was misting...I was a bit inked up at the time....but here is an example of how i started....


After everything is completely dry add some Want 2 Scrap black bling and a title in black. 


I also used some more stamps from Donna called "Banner and Words". I diecut a small oval in cream and stamped "Believe" in black. This was placed before I misted. 


More stamps from Banner and Words. These I stamped after everything was dried. 
I also re-doodled in black the stitches to make them a bit darker. 
Check out the button...it sure is grungy! It actually looks sticky, but it is dry as a bone! 


Can you believe this is the same plain blue rose? 


Well, I hope you are inspired to try your first grungy art piece too. 
It really was fun to jump out there and try something new, dont be scared like me! lol
For a chance to win some goodies from Donna...be sure to stop over HERE.
Have a great day....hugs

Products Used:


Thursday, August 16, 2012

Sisters

Hello scrappy friends!
So, at Donna Salazar's Blog "circle scrapbook" we are exchanging some photos with each other DT and I sent this photo to Jessy one of my DT members. She did a wonderful lo of me and my little sister But Im using it again here. :) Thanks sweetie! You can see the first here.
I wanted to use this photo again in colors that my sister loves...she loves purple and silver...plus red and golds...coming soon! This is a photo that was taken (1974) when I was 5 years old and my sister was 2 years old... plus our beloved kitty at the time Mrs. Silaghi. :)


A closer view of the metal clocks and embellishments....
All the faux stitching is just dots made with a black marker...


I added some black bling and I placed the title in the metal piece from Tim Holtz"Ornate Plates"


You can see here I even added lots of eyelets and wove through them with black ribbon.
I misted the whole page with Donna's "Mixed Berries" and Perfect Pearls "Heirloom Gold" it looks more silver when misted. 


Thanks for stopping by...have a great day! 
hugs! 

Wednesday, August 15, 2012

Heartfelt Wednesday's

Welcome back to another Heartfelt Wednesday
This is a new layout that I made with the amazing new collection "Ornamental Light
the papers are just so beautiful and I love the crisp cool blue papers. Lots of diecuts on this layout using the "decorative metal fixtures" that is exclusively at Heartfelt Creations. The delicate details and possibilities of using this diecut are really endless. It is yet another perfect touch to all their amazing stamps. 
This is a photo of my daughter and her close friend. 
I printed it in black and white for a cool wintery feeling. 


All the poinsettias are made using "petite poinsettia" stamp and matching "layered poinsettia" diecut.
Lots of bitty blossoms here too....just love them! 
The blue tree was inked and embosssed..it is part of last month's collection "classic editions" I then just fussy cut it out. I placed a a lantern from "decorative metal fixture" in the center of the white diecut with tiny pearls. 


More poinsettias and another lantern. 


Here i added flower soft to my title...for a real chilly feeling! brrr! 
Wish it was cooler here in AZ! lol
Also dont forget to add some bling :)


Hope you enjoyed my project for today...be sure to check out more designs sing this fabulous collection by out amazing DT at Heartfelt Creations Blog.
Have a great day! 
Hugs....

Thursday, August 9, 2012

Mojo Monday #253 "Hello Sunshine"

Good evening! I usually dont post so late in the day but I made this card for mojo monday and it is already thursday! So I sure wanted to post it since it has been sitting for a couple of days now. 
Here is the sketch for the week: lots of fun layers. 
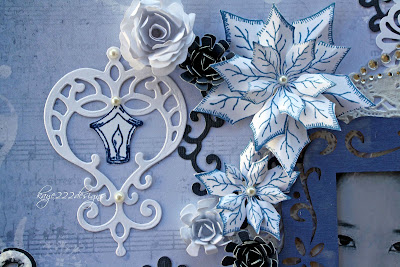

So here is my card. I wanted to make it country looking and I bought these cool papers for $2 bucks! 


I also made the yellow rose using rose creations....i sure am a rose addict! 


I made a triple bow ribbon and I really love the way it turned out. 


Thanks for stopping by! 
hugs! 

Wednesday, August 8, 2012

Heartfelt Wednesday's *NEW Ornamental Light Collection*

Welcome back to this month's NEW release with Heartfelt Creations
It is called "Ornamental Light" Collection and it has lots of beautiful stamps and diecuts for this coming holidays! I know it seems a bit early since it is so hot outside...but that is perfect to start of your holiday cards and last year's scrapbooking pages, since who wants to be in the heat? yuk! 
So here is a layout I made not only using many of the new collection but also with MORE new designer papers from Heartfelt too! These holiday papers are really beautiful but also so sturdy! love it!
This is my little Roxy once again....lol


You can see the birdhouse has some vines and the poinsettia, with the adorable little bird that can also be combined with the "garden romance" diecut. I also made extra poinsettias with "petite poinsettia" and also with the matching "poinsettia diecut". The light green ferns in the background is also part of the new collection...they are so detailed and you will just love them.... I decided to fussy cut them out and layer them a little bit. 


The light fixtures are beautiful and they rally give you a holiday feel to them. There are lots to chose from in the stamped package. I traced the tattered angels screen and added flower soft...
gotta have some snow please! 


Check out the beautiful font for all your projects.


Hope you got a little holiday mojo going for it sure does come quickly! 
Be sure to check out more projects with the fab DT and also a chance for you to win this amazing
"Ornamental Light" Collection too by leaving a comment on the 
Have a great day....hugs!

Monday, August 6, 2012

Mon Amour

Good Morning! I hope everyone had a great weekend. 
So today Im sharing a new layout that I made inspired by the amazing Finnabair.
Her grunged artwork is known everywhere and I have always admired her art, but was always way too afraid to try it out. Mostly because what if I dont like the colors after everything is placed down on paper? So, for my very first grunged art piece, I thought a light pink should be ok? Well, Im so super happy with the results! Whatcha think?


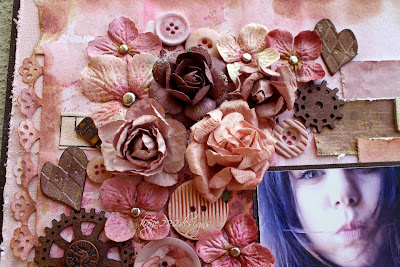
The entire background paper was white cardstock. I first cut a .25 inch around, then I punched with 3 different punches around parts of the edges. I distressed the rest of the edges with a distresser and brown ink. I actually made a brick template in paper to start my grunge. After that I stamp in pink and brown some of donna salazar's stamps "bubbles" and "my love" Next came all the flowers...I just happened to have lots of prima leftovers and lots of pink buttons that I have had forever! I just added little silver brads in the centers. 


The silver circles are paperclips that I bought at the local target. The cogs are from donna salazar and I distressed them in brown ink and I also did the same for the grungeboard hearts from tim holtz. 
The tiny clocks are from Bo Bunny and they just are perfect little pieces of metal for this lo.


I added some leftover pieces of patterned paper for the banners. The title is a soft cream letters from Prima...they are so beautiful! I also added some pieces of ruler ribbon for a touch more of cream. 


So after all the embellishments were on the layout, I took a deep breath and covered the photo with a scrap piece of paper and started spraying more tattered angels in "tea rose"
thank goodness it turned out ok! I sure would have cried!! 
Thanks for stopping by and have a super great week!
xoxo