Wednesday, April 27, 2016

It's A Dry Heat! With Cheery Lynn Designs


Hi everyone! Im back today sharing a new card for Cheery Lynn Designs using their New Release Northern United States and Provinces. I live here in Arizona, so I had to share the popular "It's A Dry Heat" card. This card was inspired by a post card here in AZ. I placed the "Arizona State" in the middle of the card. The State was cut 3 times in each color and then I fussy cut the white cardstock behind it. It really makes it pop out a bit more. In the center is a star from "100 stars" 


The "scalloped frame" was cut in light purple and kraft and then placed together. The cactus was made using "surfer's up set" surf boards and I embossed them to look like cacti. I also used the small bushes in kraft since it is hot in the summer and everything turns a bit brown. 


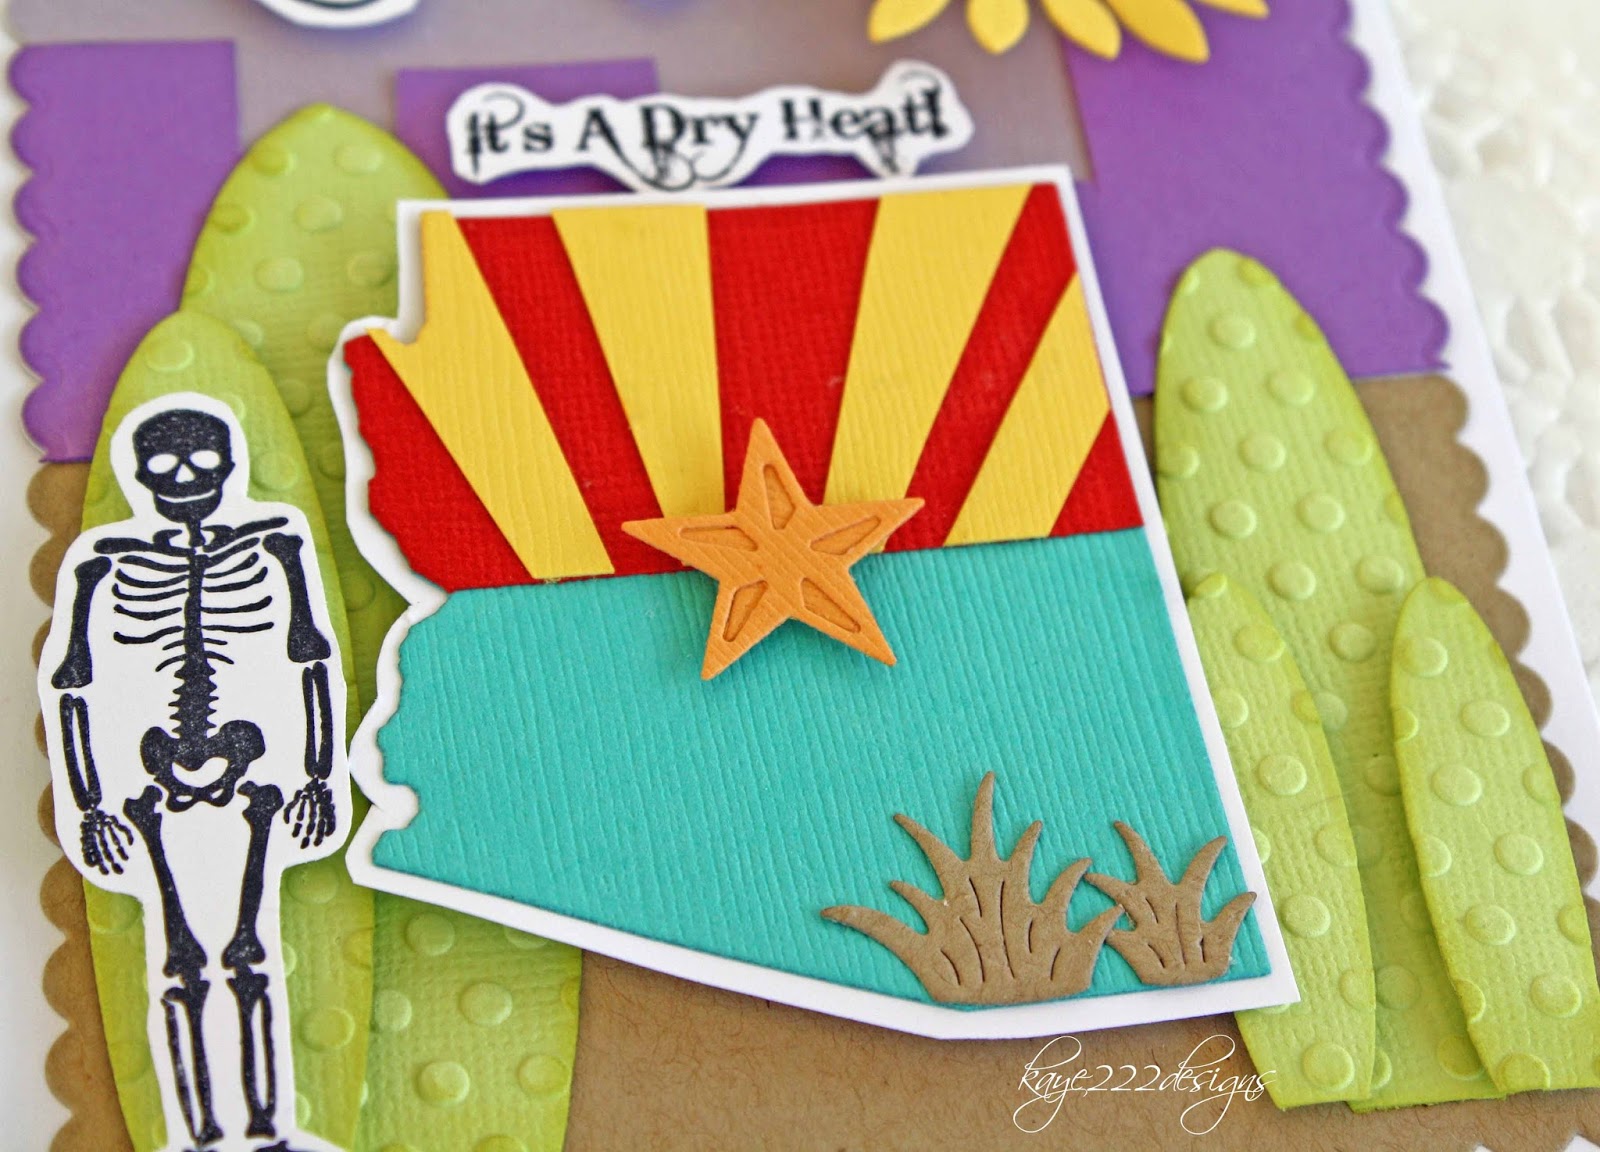
The sun was made using a "sunflower" and the font is microsoft word Bleeding Cowboys. The little skeleton is a stamp that I fussy cut out. Lots of pop dots behind, but you could also leave it flat for mailing out.


Hope you enjoyed! 

Cheery Lynn Designs Dies Used:


Thanks for stopping by and  be sure to check out this week's challenge at Cheery Lynn Designs Blog for your chance to win $20 at the Cheery Lynn Designs Store
Have a great day!
Hugs, Lisa 

Friday, April 22, 2016

Princess Castle


Hi everyone! Im back today sharing another box card.  I had a blast making this fun card. I have been wanting to use this castle since I received it  from Cheery Lynn Designs. I was inspired from another box card from svg.cuts using a castle in the front. Cheery Lynn Designs "castle" is slightly larger than 3 inches wide. So I made a box card using a piece of white 6 x 12 inch cardstock and scoring at 3, 6, and 9 inches.  I then turned it and scored in the middle at 3 inches. There is a 1 x 3 inch piece of cardstock glueing the ends together in the inside. 


I cut 3 of the ends off and die cut the top edge with "curved border" I did that two more times for the back and in blue for the sky. The castle was die cut 6 times. Three in hot pink and 3 in light pink. Lots of fussy cutting out but the lines are there so it is really easy to follow. I layered throughout and there are 3 inserts in the center. 3 x 4 inches and scored on the 4 inches a half inc on both sides, then glued in the center. 


Lots of "clouds" and I printed the sentiment from Microsoft Word. 


Closer view of the castle. There are a few pop dots in the front. I decided to add some waves to represent a moat using "at the beach". My family says it looks like the beach...oh well part of creativity right?...lol


Here you can see it flat for mailing to that adorable princess in your life! 


Hope you enjoyed!  Thanks for stopping by today! 

Hugs Lisa

Tuesday, April 19, 2016

Victorian Purse

Hi everyone! 

I have been busy making lots of projects and cards for Cheery Lynn Designs. I was browsing through my posts and realized that I made this paper purse bag for a close friend that I enjoy going to all the conventions in town. She had made me a beautiful purse and I didn't want to copy her adorable bag so I made this one inspired from pinterest. 


I tried to make it shabby chic/vintage and used papers from K & Company. I used pre made flowers and added pearls throughout. 


There is some cream lace and the sides are an accordion fold.  


A cute bow on top made using my bow maker and the edge of the handle was used with my Martha Stewart punch. 


The leaves were made using Rose Leaves from Cheery Lynn Designs. 


The back of the purse. 


Thanks for stopping by...had fun making this purse for my friend. 
Hugs Lisa 

Sunday, April 17, 2016

Aged To Perfection With Cheery Lynn Designs


Hi everyone! Today, I'm sharing with you another new card made for Cheery Lynn Designs using their New Release North American and Provinces. When the DT was asked to pick out which 3 dies they wanted to design with...one of mine was originally Florida. However, several of my team wanted it too. So I thought I would change it to California since I do visit there often. As I was thinking of designing a card with California, I thought of Wine Country! 


The "California" state I die cut and then fussy cut around it in purple to stick out a bit more. I then stamped wine glasses and a sentiment on top. I also stamped some grapes and a wine bottle, they are colored with topic markers. 


The flowers are "sweet williams strip " and the leaves are " flourish #14"  I also added "tiny flourishes" for some swirls. The flowers are chalked on the edges for a tiny distressed look. 


I added several pop dots behind the dies...they are addicting! lol


Cheery Lynn Designs Dies Used:


Be sure to check out more fabulous designs for our DT and make sure you check out this week's challenge for your chance to win $20 at the Cheery Lynn Designs store! 
Have a great week! 
Hugs Lisa 

Friday, April 15, 2016

Blog Hop New Release Northern American States and Provinces "Aloha" With Cheery Lynn Designs


Hi everyone! Welcome back to this month's blog hop with Cheery Lynn Designs! If you have just come form Julie's Blog you are in the right spot! Otherwise, you can start HERE at the beginning of the Cheery Lynn Designs Blog

Today, we are debuting the new release called Northern American States and Provinces! There are so many ways of using this collection and I hope you can be inspired by my "Hawaii" card and mini purse/beach bag.


I'm still on my beach mode and I'm thinking I might be there for a bit longer! LOL
I used several older Cheery Lynn Designs Dies too. You can see them below.


When I think of "Hawaii" I think of sand beaches, palm trees, under an umbrella having maybe a tropical beverage! Yum! Next to me is my beach bag with a few extra essentials, sunglasses, flip flops, sunscreen and my love! 


Here is the back of the mini purse...I added more flowers and waves.


The inside of the mini purse....for a lip balm. 


New Release Cheery Lynn Designs Die:


Older Cheery Lynn Designs Dies Used:


Thanks for stopping by my blog and be sure to continue to the next blog Amy's! for more inspiration and your chance to win some goodies at Cheery Lynn Designs
Happy Hopping!!! 
Hugs Lisa 

Wednesday, April 13, 2016

Beach Box Card With Cheery Lynn Designs


Hi everyone! I wanted to share with you today a beach box card using several Cheery Lynn Designs! This is my first box card and it was really was to fun to make. There are so many different sizes of box cards. This size is easy to place in an envelope to mail. It folds flat and is approximately 4 x 5.5 inches.There is a video on you tube by Meg Loven that is a tutorial on the base of the card. You can see it here. Thank you! 


One the bottom of the box I used "victorian picket fence" with some "grass border 2" because I was thinking of the fence sometimes you see along the beach with bits of grass. 


Here I used "ship's anchor" and I inked the chain in white. I placed a small sentiment on top. The "tiny flourishes" are throughout the box. 


I also wanted to add some "starfish" So I made two in white and two in kraft cardstock.   Then in the center I used  "lighthouses" in kraft cardstock and layered white cardstock behind the window openings.


All the flowers are from "sweet williams" and I placed pearls in the centers. The largest ones were using all the flowers and as I made them smaller I just cut some of the larger ones out. 


The larger greenery in the background are "fanciful flourish" and I cut them up and placed them throughout the few layers in the center.


One closer view of the center. 
Hope you enjoyed my fun beach box card! 

Cheery Lynn Designs Dies Used:


Thanks for stopping by today! 
Be sure to check out this week's challenge for your chance to win 
$20 at the Cheery Lynn Designs store! 
Hugs Lisa 

Wednesday, April 6, 2016

Flower Pot Card With Cheery Lynn Designs


Hi everyone! Im so excited to share this flower pot card using Cheery Lynn Designs Dies with you today! I have seen several of these cards and I wanted to make one for my mother for Mother's Day this year. So I thought I would make one early to make sure it comes out the way I wanted it to look. OMGosh! If you hadn't made one of these flower pot cards in the past...I highly recommend you trying to make your first. They are truly beautiful! 


The base is 3.5 x 9 inches. Scored at 2 inches and 5.5 inches. I then cut 1 inch off the top of the 2 border and added the "border carnivale" in white for the edge. I layered some ribbon  around the whole top and added a bow towards the left side. I then die cut 3 sets of the "sunflower set" in yellow and placed some black gala glitz in the centers for a bit of bling.  The 2 largest "leafy flourish"were placed behind the flowers and then I added 2 of the smaller "leafy flourish" to drape down onto the flower pot. 


The insert with flowers and your personal message is 2.75 x 5 inches. I stamped a sentiment on the left hand corner and added 3 small butterflies from "mini dimensional butterflies". There are so many cute butterflies to choose from this set. I layered them in white cardstock to make it pop out a bit.  


Hope your enjoyed my flower pot card today! 

Cheery Lynn Designs Dies Used:


Be sure to stop by and enter this week's challenge for your chance to win $20 at the Cheery Lynn Designs store. Have a great day!
Hugs Lisa