Sunday, December 26, 2010

SCRAPTHAT! **JANUARY KITS**

The new January Kit from SCRAPTHAT! has so many beautiful papers from My Minds Eye Lost and Found and many embellishments that you will love them just as much as I do! This is my first DT and I was so excited to see how great this kit would be!
In this first lo, the feathers that come with the kit made think of Native America and so therefore the title reflects that....Roxy is my Rose and the blue feather flower went so well with this photo...
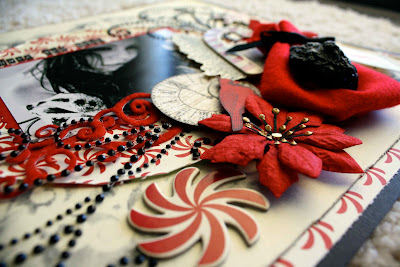
In this lo, I bought out all the beautiful reds that comes with this kit! I used the red stickles, included in the kit to make my own swirls. I also used more of the gorgeous papers to make my own flowers. The pearl brads for the flowers also come with the kit!
In this lo, I wanted it to be sophisticated, glamourous with a bit of a vintage look. It is glittery and the butterflies that come also with this kit are stunning!
I hope you will come over to SCRAPTHAT! to see these new kits for January! There are so many more embellishments included that I am even working on another lo using this kit!
Enjoy!

Tuesday, December 21, 2010

ScrapThat! Sneak Peeks...

Im so excited to share the new kit coming up with ScrapThat! The papers are beautiful and a must have this upcoming new year!

Blue Christmas

This was a photo of my adorable niece right before Christmas! Isnt she so adorable!
I love the Martha Stewart Christmas Papers this year! I had to add bling and my stamens for this winter lo!
Enjoy!

Monday, December 13, 2010

Have you been?

Have you been naughty this year? Well, as some of us parents know that are children can be naughty sometimes…especially teenage years! Lol So this layout was inspired for fun to remind us that not always are our children as nice as we want them to be. The tag was inspired on line from design des troy. I loved the tag and so I decided to make my own. It is not exact but close enough to make right in your own home! Oh, and of course like I always say “any size or colors”!

Here is the finished layout:

Here are some close-ups:


Happy Holidays!


Tuesday, December 7, 2010

ScrapFIT Design Team Call!!


ScrapFIT Design Team Call
February – July

Submission Deadline – December 30th

ScrapFIT (www.scrapfit.blogspot.com) is a growing scrapbook challenge blog that will give you a real workout! We have 2 workouts (challenges) per month and they are sure to push you out of your comfort zone and inspire you to try something new! We are looking for 10 fun and creative designers (aka -FITgirls!) for our February - July term! We are also looking to fill 6 Guest Designer spots, one for each month (Feb- July). If you would like to be considered for only Guest DT spot, please note in your submission.

FITgirl Requirements:
*You must have an active blog
*You must be commit to 2 layouts per month based on our challenges
*A person who enjoys inspiring others
*Someone who is committed and turns in projects on time
*Someone with enthusiasm for ScrapFIT and their challenges and the dedication to help promote ScrapFIT through their own blog and other site they participate in.

What To Expect From ScrapFIT
*Although this is not a paying gig we can help spread the word about your scrapbooking awesomeness!
*A special FITgirl blinki for your blog
*Your photo, name and link to your personal blog on the main ScrapFIT webpage!
*A great addition to your scrapbook resume
*All of the challenges will be giving to you at the start of your term so that you have plenty of time to work on them when you have the chance.
*A fun and relaxed group to work with.

To apply please send the fallowing information to szenger@twcny.rr.comby December 30th:
Please put ScrapFIT DT Call in the subject line

1) Name
2) Address
3)Email Address
4) Link to your blog and/or online gallery
5)List of other Design Teams past and current
6)3 examples of your best work. Let us see your style!
7)Tell us why you would be a good fit for our team!
8)A little bio about your –if you are chosen this would be your introduction bio.

Winners will be announced on January 1st. GOOD LUCK TO EVERYONE!

Monday, December 6, 2010

Exciting News!

I have two announcements to share with everyone!
First I am proud to be invited to Canada's Best Kit Club "Scrap That!"
I have seen the recent kits and they are so beautiful, I cant wait to start my first kit and also being on my very FIRST DT! Im very honored to working with some of the most talented artists at Scrap That! Thanks ladies!
My second exciting news that I wanted to share is I was picked to have one of my lo's to be published at Scrapstreet.com magazine in the upcoming months....will reveal later....
Thanks for sharing this great news with me!

Sunday, December 5, 2010

Christmas Log

Hi
Well, its almost been a whole week and I haven't been able to do a new layout yet, but I did make this Christmas Log for my annual cookie party this year. In fact, I made 10 of them!
For many years now I have been going to a cookie party with some old friends that some of us only get to see each other once a year. It is really fun to do and the best part if you get 10 dozen different cookies back! YUM! My husband cant wait till I get home with them....lol
During our chatting we all enjoy the cookies with coffee and then we all vote for the best cookie and the best decorated packaging. Thats what I love to do the most...it's like scrapbooking...let the creativity go! This is not my idea of the Christmas Log..I seen it last year from Martha Stewart. However, since last year I knew that is what I was going to make.
My daughter, Roxy, was able to get the perfect size containers free for me. I found the paper at Joann's...and was able to cut them in half...costing 10 cents each. The green ann gold spray I also found at Joann's. The birds I just added red feathers to make them more elegant. I added ribbon and with my cricut made a stamped tag.
Here are some photos of the finished log:
Here is another angle:
Hope you enjoyed!
***Updated @ 1650 today....they were a big hit and I won the decorating part! YAY!

Saturday, November 27, 2010

Naughty Or Nice?

Hello everyone!
I hope everyone had a great Thanksgiving Day!
Im trying to get into the holiday mode. So I started this layout yesterday and finished it this morning. It is my daughter from last year...she looks a bit Naughty to me???? lol
Actually, she has been a really good young lady or the past year and well, as many of us have older teenage girls know that that is not always the case!

I used some items that I bought last year and finally am getting around to using them. I also have been using my Heartfelt Creations stamps lately. If you don't own of them you definitely have to get them. I absolutely love them and so will you.
I also have been on a faux "dusty attic" kick. So I made this frame using a similar design and I added the hollies instead of the regular leaves. That is the best part of making your own embellishments...you can make them any size, color or add/delete whatever you want. Im really all for making your own embellishments to save some on your scrapbooking supplies, since we all know how we want EVERYTHING!
So here is the question? have you been NAUGHTY or NICE this year?
Here are some close-ups:


Thanks for stopping by!

Friday, November 26, 2010

"Scrap That" Kits

Hi
I hope everyone had a wonderful Thanksgiving!
Now that we are officially going into the holiday season....
I wanted to share the "Scrap That" December Kit that some of my new friends joined!
The kit is beautiful and you can see some examples over @ scrapbook.com.
Come on over to "scrap that" . You will be so happy that you did!

Happy Holidays!

Thursday, November 25, 2010

Thankful

Happy Thanksgiving!
This year I am thankful for many things...but when it comes to scrapbooking I am thankful to my daughter who always takes great photos and makes my scrapbooking fun and much easier to do. This layout is all about how I wanted to thank her for it.
I made the faux "dusty attic" clock recently and so I made a matching frame with the same basic technique.
First, I cut a frame out with my George cricut cartridge. It is the rectangle using the silhouette option. then with quilling papers making the swirls and again with cricut storybook adding the leaves. Pretty easy and it matches the clock perfectly!
Here are some close-ups....


Thanks for stopping by!

Monday, November 22, 2010

Faux "Dusty Attic" Clock

I don’t own of these gorgeous “dusty attic” chipboard pieces. Plan on getting some at the next convention! Meanwhile, I just love the delicate, intricate artwork, which is my inspiration to make my own. Here is how to make the “dusty attic” clock out of paper!

It looks much harder than it is…however, the pieces are small and delicate so be careful not to tear it while gluing the pieces together. Once it is dried, much easier to handle….

Here is the real “dusty attic” chipboard clock…my inspiration…

Here is the the faux chipboard clock....out of paper…

First you need these products: kraft cardstock, quilling paper, quilling tool, glue, cricut (storybook cartridge) black ink, brad, and a clock stamp.

If you don’t have quilling paper make very this strips with cardstock, I think its 1/8 of an inch. If you don’t have a cricut you can use small punches and if you don’t own any clock stamps there are plenty of clocks on clipart that you can print up on your cardstock.


Second, make swirls with your quilled paper (cut the quilled paper in 2 pieces) in any design you like to surround the circle clock and glue together. Make some in the same direction and others in the opposite direction.

Then using a 2inch circle in kraft paper stamp a clock on it.

Next using quilling paper wrap it around the clock so that it will attach easier to the rest of the quilled paper. Place two pop dots behind the clock to give it more of a 3D look and add a brad in the center.

Third, using storybook cricut or punches, make 2 leaves and 4 scrolls ¾ inch big. Place on top of quilled paper and glue down.

That’s it! Now you have your own faux “dusty attic” clocks!

Hope you enjoy!

Saturday, November 20, 2010

Chicago Steampunk

This is my very first steampunk layout that I did for a challenge at scrapbook.com.
I love the city of Chicago and my family and I go there often. It is where most of my family lives and close to where I grew up. I so miss the water....so now when we go to Chicago it is like a vacation. I took this photo a few years ago....
Here are a few close-ups....I used my cricut to make all the gears....so much cheaper than buying lots of the metal gears....plus you have the options to make them any size and color you want!


Thanks for stopping by!

Sunday, November 14, 2010

Dark Fairytales

I was wrecking my brain out since the beginning of the month for a challenge over at scrapbook.com. It is the Darker Side Challenge for the month of November, come on over. I had such a hard time making this layout because the catch was to make a fairytale dark....
This is my result...and well it is not exactly what i imagined but i think it looks like a dark Beauty and the Beast design.
I bought a bunch of stamps from the convention recently in Mesa, AZ. One of my favorites over the past couple of years has been Heartfelt Creations stamps. They are truly beautiful and so many to choose...I used my favorite leaves and a new book stamp, the ideas are endless. I have more ideas coming soon with this book/bible stamp.

Here are some close-ups, of the stamens and the stamps.


Thanks for stopping by!

Monday, November 8, 2010

Money Saving Stamens


Ok, I have seen so many homemade flowers lately, and so I finally gave it a whirl. I wanted to add those beautiful stamens ladies have been using but I didn’t have any and I really didn’t want to buy any so I decided to make my own. These are MONEY SAVING STAMENS!

First, I made my flower with my cricut or you can use a punch in a scalloped pattern. Then chalk the edges on both sides.


Second, using a small punch or on Home Accents, Cricut, you need a similar design that has small circles in the design and then you place pearl stickles on all the small circles and let dry.


Third, place a brad or embellishment of your choice in the middle and place on top of the flowers….Thats it! Now you have your own homemade stamens, which I think they are as good as store bought ones.

Here is an example on a layout:

Here are some close-ups to see how truly beautiful they can be with your own personal touch. The best part is you can make them any color you want for all the upcoming holidays!


Hope you enjoy!

Sunday, October 31, 2010

Faux Envelopes

I recently seen some adorable envelopes from Maya Road-Kraft Collection and I thought I could make them myself by using kraft paper, eyelets, string, and chalk.
It is pretty easy to do...tutorial is below:

This is a High School photo of Roxanne, my lovely daughter, I just love this sepia photo of her. It captures her in her prime of youth. How time flies so quickly....


Here are a few close-ups:


Here is the tutorial for faux envelopes:

First, make two 4.5 inch rectangles from kraft paper.


Next cut one rectangle in a wave pattern with wave scissors and then punch small holes in each scallop. Chalk both pieces all around and place scalloped paper on large rectangle, glue together.

Last, make 3/4 inch circles and add an eyelet in the center. Use pop dots and place on the envelope where ever you want them. Then add string or cord around the circles for a completed envelope look!

Enjoy! Thanks for stopping by!


Saturday, October 30, 2010

Happy Halloween!!!


Hello,
I wanted to wish everyone a safe fun Halloween this year!
Here is a layout I made for this Halloween season!

Both Layouts are from Martha Stewart Halloween Line. I love the dark, eerie colors this year.
I made some of the embellishments on both layouts and added spider web to both of them to give it an aged creepy look!

Happy Halloween!


Perfect Pumpkins


I love pumpkins! This tutorial is for making perfect pumpkins for all your Halloween and Autumn scrapbooking layouts this year. These are super easy to make. You can stamp or journal and make them any size you want; sooooo PERFECT!


First, cut out/punch circles and ovals…I used 2-inch circles and 2.5-inch ovals in 2 different oranges.


Second, I chalked the edges and stamped one of the ovals in the center.

Third, overlap the ovals and circles to your desire and add some swirls for the leaves. That’s it!


Here is an example using perfect pumpkins.

Enjoy!