Showing posts with label Clean and Simple. Show all posts

Friday, December 4, 2020

Ho Ho Ho

Good afternoon! So today Im sharing a quick card that is actually flat! Say What! It is a challenge for me for sure. However, I was making these for some people that I know in a quick production line. It was super ironic that it happens to fit in this week's DD challenge Santa hats


A closer view, The hat is from Elizabeth Craft Designs and the font is from Impression Obsession. 


Here is the adorable inspiration! Thank you! 


Have a great day! 
Hugs Lisa 

Thursday, February 1, 2018

Happy Valentine's Day with Cheery Lynn Designs


Hi, Welcome back to a quick clean and simple card with Cheery Lynn Designs
I have been making lots of cards with pinks and hearts lately....so why not one more for the upcoming Valentine's Day. 


I used a white base with pink and then I used a "stitched rectangle" and embossed it with "hearts" One "celtic heart" cut in pink and in white glued together. A heartwarming sentiment, ribbon and pearls. Done! 


Thanks for stopping by....
Have a great day! 
Hugs Lisa 

Thursday, December 21, 2017

Snowflakes With Cheery Lynn Designs


Hello again! Welcome back to a Clean and Simple Card for Cheery Lynn Designs! 
If your looking to make a fast and easy card to send out last minute...this is it! 
I used Snowflake Delight 1 (clearance) and Snowflake Set1 with the Snowflake Flurries Embossing Plate. 


I added a few pearls for some bling but you could also use some stickles or nothing at all....the snowflakes are beautiful all by themselves. 


The sentiment was stamped in black....my go to ink! 


Thanks for stopping by today!
Hope you have a wonderful holiday season!
Hugs Lisa 

Wednesday, November 1, 2017

Happy Fall With Cheery Lynn Designs

Hi welcome back to Cheery Lynn Designs with a super fast clean and simple card! I half to tell you if your looking for something easy and fast to send out to to family and friends for the fall/autumn this is a perfect card for you! 


I decided to make it a rainbow card with using one leaf and a brick background. That's it.


Love the details of both the embossing and the leaf. The sentiment is from Verve.


Cheery Lynn Designs Dies used:


Thanks for stopping by today!
Hope you have a great rainbow day!
Hugs Lisa 


Friday, March 17, 2017

Have a Sunshiny Day!

Hi! Happy St Patrick's Day! 
Im off today and was able to play a bit this morning in my scrap happy place! A pot of gold is at the end of the rainbow...so that is today's theme...Rainbows! This is a fast clean and simple card to make. 


I used the Lawn Fawn Puffy Clouds for the main focus. I used them recently and I really do LOVE them a lot. The clouds and the sun  are from Cheery Lynn Designs. I added the google eyes on the sun. The sentiment is from Verve stamps. 


You have to LOVE the stitching in the clouds....


Have a great St Patrick's Day and safe weekend! 
Hugs Lisa 

Monday, July 11, 2016

You Are Awesome With Cheery Lynn Designs


Hi everyone!! 
Today I thought I would share with you another super fast card using only one die from Cherry Lynn Designs! It is part of the new collection called "whimsical "you are awesome" To make this card I used one piece of white cardstock 5 x 12 and scored at 6 inches. The a fun patterned paper cut at 4.75 and 5.75 inches. Not sure if this card would be considered CAS? Im thinking Maybe? lol


Add some piece of ribbon and a bow on top.  Don't forget the pearl bling! 


Here is how I raised the sentiment. I ran a piece of white cardstock through, then I ran a piece of white foam through...I did it twice to make sure it cut it out perfect. Then glue the two pieces together. Done! 


Cheery Lynn Designs Die Used:


Thanks for stopping by today! 
Be sure to check out this week's challenge for your chance to win $20 at the 
Have a great day!
Hugs, Lisa

Saturday, June 11, 2016

Hello Friend With Cheery Lynn Designs


Hello friends! Today I have a really Clean and Simple card for you to make using one Cheery Lynn Designs Die! It is part of the May 2016 New Release called "Cherry Blossom Branch" It's Beautiful! If there is one die cut that you want in your collection...it is for sure this one....
I tend to add lots of layers to many of my cards and of course I'm a pop dot addict. However, I also think that Clean and Simple cards are beautiful too! 


The die was cut 4 times, twice in green and twice in red. Then fussy cut out the red flowers and glue on top of the green. add pearls and your done! The sentiment was stamped in the corner. It is super flat except for the pearls but it should be easy to mail. Takes about 5 minutes to make. :)


Here you can see a close up the intricate details in the flowers and the leaves.  I layered red cardstock and a patterned paper underneath for more color, but it also looks great plain. 


I LOVE red! and this is the cover of the die cut that inspired me to make this card today. 


Cheery Lynn Designs Die Used:


Thanks for stopping by today! Hope this Clean and Simple card inspired you and be sure to check out more inspiration throughout the week from our fabulous DT. Check out our challenge too for your chance to win $20 at the Cheery Lynn Designs Store. 
See you next week!
Hugs Lisa 

Wednesday, February 3, 2016

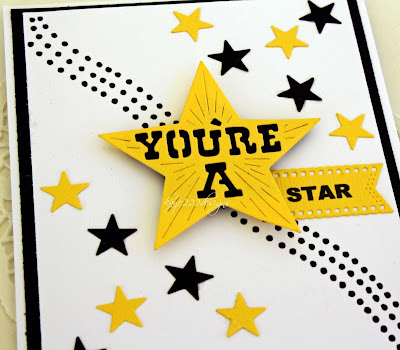
You're A Star With Cheery Lynn Designs


Hi everyone, it's Lisa back today with a super quick card using the new release "you're a star" with Cheery Lynn Designs. I kept the card clean and simple and literally a matter of minutes to make for that super sweet boy for any occasion.


As you can see, I just added more stars from "100 stars" and used the smallest "pierced banner" to print up the word "star". I also added pop dots behind the large star for more dimension.


Cheery Lynn Dies Used:


Thanks for stopping by today and be sure to check out this week's challenge and next week's challenge starting tomorrow...for your chance to win $20 at the Cheery Lynn Designs Store.
Hugs Lisa

Wednesday, October 31, 2012

Heartfelt Wednesday's *Clean & Simple Pink HBday*

Hello and Happy Heartfelt Wednesday!
This week I lost my mojo again and so I decided to make a clean & simple card using more of the "vintage floret collection"
This card uses most of this month's release and it really is great for a quick card when your in a hurry. 


I just love the roses and with a bit of bling this card is ready to go! 


So be sure to stop by this week to see the NEW Design Team and lots of new inspiration will be coming your way....at Heartfelt Creations Blog!
xoxo

Sunday, August 26, 2012

We're "Perfect" Together - Reese Peanut Butter Cups *SOUS*

Hello again today! Yes it is still Sunday...lol 
This was a super duper fast card that I made in just a few minutes because the cricut does all the work! 
Love it! I made a card for the first "Stuck On U Sketches"and well, I checked out the latest sketch and as soon as I seen it... "Reese Peanut Butter Cups" popped into my head! Chocolate one more time....last time chocolate popped in my head I couldn't stop singing "Pure Imagination" from Willy Wonka. Hope that doesn't happen again....please please....NO!
So here is the sketch made by Leah Schaeffer...so fun...thanks :)


Here is my Reese Peanut Butter Cup card....as you can see there are many candies..YUM...like who can only eat one? I originally was going to leave off the bites but i ended up using them. There is no patterned paper used so it is really fast and easy to make. The card is a 5 x 6 base in kraft cardstock and the scalloped circles in dark brown are 1.5 inches with 1.25 inch kraft circles in the center. I chalked the edges up with brown chalk a bit before gluing them together. 


The font is called "buttarcup" and I found it on free fonts online. I used the "ribbon banners" for the title in white cardstock. I was going to use "You're Perfect" but then I thought of the slogan for the candy and it is about chocolate and peanut butter...hence the new title "We're Perfect Together"


All the candy has pop dots under them for a 3D look and some yellow ribbon made this card complete in less than 10 minutes...


Hope the rest of your day is "SWEET"!
Thanks for stopping by again...Love hearing from you!
Hugs!

Sunday, April 22, 2012

Mickey Mouse Birthday

Hi, I have been making my daughter's College Graduation Announcements all day, but I was able to make this week's Viva La Verve sketch too!
So since, Im always making flowery cards, I thought it would be fun to make a kid friendly Birthday card with this great sketch....thank you Shannon!


Here is my card...it is Disney colors with some bling and more bling! I colored Mickey with the First of my NEW copic makers, skin white and added stickles in black, yellow and red. Then I added rhinestones on the top corner and swirls. 


Here is a closer view of the Happy Birthday font called "Waltograph"...it sure is Disney! 
Love it!


Have a great day! Thanks for stopping by!

Saturday, February 25, 2012

Chocolate Bunny

Happy Saturday....
Well, I have been super busy with lots of DT work lately....but that didnt stop me from getting the new sketch from Verve this week! I changed it to the opposite side...but it is based off the sketch. This week is Clean and Simple....

As you know I have been on a chocolate roll lately and with Easter around the corner I thought of all the Chocolate Easter Bunnies on the shelves....
Well, I kept the base of the card simple and the ribbon takes care of itself...the title is printed from the computer right on the card. The wreath is really easier than it looks...here is the tutorial. For this wreath I used a leaf punch and the tiny flowers are Fiskars small punch. I added pearls in the center...

The chocolate bunny is a free clipart and I just printed it on brown cardstock, fussy cut it out and embossed it with my cuttlebug. I wrapped ribbon around the neck and used pop dots behind the wreath and bunny....

Thanks for stopping by....hope you were inspired by my chocolate bunny too!

Saturday, February 18, 2012

Tiffany (Inspired) Cupcake

Hi,
Today is my oldest daughter's Birthday! She turns 23 today and I wanted to make her a girly card....so I was inspired to make this tiffany cupcake card. Now what girl doesn't love tiffany? lol
I have had this ribbon for a while and it is tiffany colors....so it was perfect to make this fast card for her. The cupcake base is from "sweet treats" cricut cartridge. After I cut out the base I ran it through the crimper to give it the cupcake wrapper. The top of the cupcake is embossed with "D'vine Swirls" from cuttlebug and I just added pearls. No patterned paper for the cupcake speaks for itself. The banner is from spellbinders and I just printed "happy birthday" from the computer. Easy and took only 10 minutes to make. :) Clean and Simple.

Another view: with pop dots too!
Closer view of the pearls and embossing....

Thanks for stopping by! Hope you enjoyed!

Sunday, February 5, 2012

Designer Gift Card Purse

Good Morning!
Hope everyone has a safe an fun "Superbowl" day! I watch parts of the game, but I'm not a huge football girl....So I will get the afternoon to play in my scraproom again! :)
Over at scrapbook.com in the challenges this month there is a purse card....so I looked up online to see how to make one...never made one before...I came across Dawn's tutorial at Stampin Up and it is fabulous! You can see it HERE. So I followed the basics of the card and added some extras and tweaked it a bit to make my Coco Chanel inspired Gift Card Purse.
So who wouldn't love to have this purse? lol

I just used my son's family discount card from Target for an example.... :) Maybe a Neiman Marcus or Nordstrom card would be nice? lol


Here is what you need:
Black and White Smooth Cardstock
26 gauge wire-silver
3 pearls
Martha Stewart Scoring Board
Spellbinders-Labels 20
Round Velcro
Black Ribbon
Skewer

First, cut a 6x6 inch cardstock in black and fold in half. Using the largest Labels 20 die cut in black cardstock. Place die cut over the folded black cardstock and mark with pencil where it meets. That will be your line to cut and line up at an angle and cut from pencil line to corner.


Next, cut white paper 5.5 inches x 2.5 inches, follow the same cutting as the black paper. Do this twice. One for the front of the purse and one for the back. Die cut 2nd to the largest Spellbinders Labels 20 in white cardstock. Using the Martha Stewart Scoring Board, place all the pieces of the white cardstock at and angle and score every half inch until you have a criss- cross pattern. If you have the embossing template, that will work too! I don't have it....but it is pretty fast to do by hand if you don't either. :) Also make a score lines on top x 2 about .5 inches apart. (Shown above in black)


Glue White cardstock on the black cardstock as shown in finished card. Leave the top of the purse off until after the handle is done.

Using the 26 gauge wire wrap it around something very thin....I used a skewer for mine. Then wrap black satin ribbon around the wire. Approximately 8.5 inches long, give or take. Punch holes on top of purse and put wired ribbon through each hole and crimp wire together in the center. You should be able to do this with your fingers. Glue down back of purse to the back.


On the inside top place the Velcro and line it up with the bottom...place clear baggie inside for gift card and add 3 white pearls to the front and last but not least the Coco Chanel signature! I used my cricut, George Basics, cut .75 inch "C's" x 2 and glue them together.


This adorable little purse will certainly be the talk of the town....
Hope you enjoyed!