Showing posts with label Steampunk. Show all posts

Wednesday, June 17, 2015

Steampunk Birthday With Cheery Lynn Designs


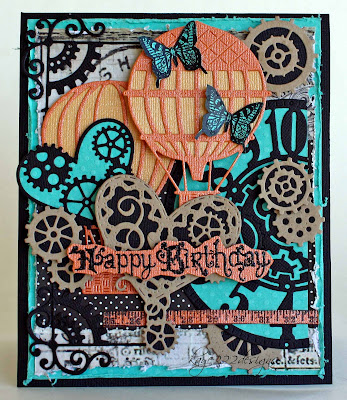
Hi, Its Lisa here this week sharing with you a fun steampunk card using several diecuts from Cheery Lynn Designs. I usually make a card only once. However, I LOVE how this one turned out that I'm going to have to make another for my own stash. :) 


I added a few pop dots under some of the Gears, Hot Air Balloons W/Angel Wings, and Hearts & Gears. The Steampunk Corners are very delicate and are perfect for every steampunk project. The Clock W/Angel Wing was originally going to be in the center, then somehow I accidentally tore one side.. :( But I'm kind of glad it is offset now, funny how a boo-boo can work out in the end :) I stamped some tiny steampunk butterflies, a ruler and embossed Happy Birthday, then fussy cut them all out.


Cheery Lynn Diecuts Used:


Thank you so much for stopping by today! Be sure to stop by this week's challenge "Keep It Krafty" challenge for a chance to win $20 to the Cheery Lynn Designs Store
Have a great week! 
                                    Hugs, Lisa                                                                                                                                                                                                                                                                                                                                                                                                                                                            

Friday, February 22, 2013

"Time Flies"

 TGIF! 
I'm so glad today is Friday and I actually have a 4 day weekend from work off. Yay!
So I started to make this week's Mojo Monday #281 sketch a couple of days ago and finally was able to finish it last night. When i seen the sketch, I really liked the basic circles but I wanted to make them somewhat different from my normal flower cards. So I was thinking about sprockets, gears and steampunk. So here is the card that I think you could give to a man or woman for any occasion. 
Amazing how "Time Flies"


So to make this card I used my cricut "accent essentials" for the sprockets using 2 different diecuts at 3 inches each. Then I used several stamp collections and embossed them with "leather" embossing powder. It looks like copper when it is heated up. I also added a few balloons and a few pieces of metal from Tim Holtz. The background paper is from the "scrap that" kit that I used earlier this month from "prima" Its so vintage and perfect for any card or layout.


In the background a piece of ruler ribbon and I used twine for a bow...no flowers.. or girly ribbons. LoL...There are pop dots behind all the sprockets and the balloons to give it a bit of dimension.


Here is that fabulous sketch that inspired this steam punk card. Thanks Mary!


Thanks for stopping by and have a great weekend!! 
xoxo

Sunday, August 19, 2012

Girlie Grungy Art

Hello Grungy girlies! It's Lisa back today and I'm sharing with you a really grungy layout with a tutorial too! I usually don't make these types of layouts because I'm always afraid it will be a disaster! Meaning the colors wont come out right or the misting will be out of place? Anyone else have that fear? If so I can totally relate :) Let me tell you that once you give it a whirl, you will be in love too! My inspiration come from the famous Finnabair and her amazing artwork. By using Donna's fabulous products you can easily get the same look with no problem. So here is my grungy art layout using 3 different mists, 2 glitters and a lot more goodies from Donna! This is an older picture of Roxy and with that dark eye shadow it thought it would work really great with the look I was going for today. 


So lets get started....
First, pick out a piece of patterned paper from the Botanique Collection and cut a .25 inch all around the paper. Then distress edges with Zutter Distrezz It All. Layer over some plain cream cardstock and doodle on the edges some faux stitches


Next, place matted photo off to the left of the page and slightly down the middle. 
Stamp Donna's ruler over  the top of the photo and place doilies in opposite corners. 
Both Doilies are small ones and cut one in half...save for another project. :) I misted the doilies slightly ahead of time with Pralines & Cream" but you really dont have too because it will get covered later.


Next, make lots of paper flowers using Bitty Blossoms and Rose Creations in 2 different shades of blue and cream to match your background paper. Ink in brown the Sprockets from Want 2 Scrap.  There are 4 pieces in the pack, I torn apart the largest sprocket to get 6 pieces, but I only used 5 of them for this project. Be sure to save the largest piece for yet another project...


Place flowers and sprockets where ever you like, I also added buttons and metal fixtures.
Once you have it all glued down, place a piece of tissue paper over the main part of the photo. It is ok to leave a little bit of the edge of the photo showing to blend all the colors together. 
OK, here comes the grungy part! :) Just start misting in spots everywhere...


I chose Pralines & Cream first, then Sea Breeze, and finally topped off with Candle Glow.
There really is no special technique to mist, just started misting in spots until you like the colors.
(I actually went back and forth with colors until it was darker in some areas) 
You can then air dry it or speed it up a bit by using a embossing heating tool.
Once it is dry add some smooch glitz on the flowers and buttons.


Im sooooo sorry...I forgot to take an original picture while I was misting...I was a bit inked up at the time....but here is an example of how i started....


After everything is completely dry add some Want 2 Scrap black bling and a title in black. 


I also used some more stamps from Donna called "Banner and Words". I diecut a small oval in cream and stamped "Believe" in black. This was placed before I misted. 


More stamps from Banner and Words. These I stamped after everything was dried. 
I also re-doodled in black the stitches to make them a bit darker. 
Check out the button...it sure is grungy! It actually looks sticky, but it is dry as a bone! 


Can you believe this is the same plain blue rose? 


Well, I hope you are inspired to try your first grungy art piece too. 
It really was fun to jump out there and try something new, dont be scared like me! lol
For a chance to win some goodies from Donna...be sure to stop over HERE.
Have a great day....hugs

Products Used:


Monday, August 6, 2012

Mon Amour

Good Morning! I hope everyone had a great weekend. 
So today Im sharing a new layout that I made inspired by the amazing Finnabair.
Her grunged artwork is known everywhere and I have always admired her art, but was always way too afraid to try it out. Mostly because what if I dont like the colors after everything is placed down on paper? So, for my very first grunged art piece, I thought a light pink should be ok? Well, Im so super happy with the results! Whatcha think?


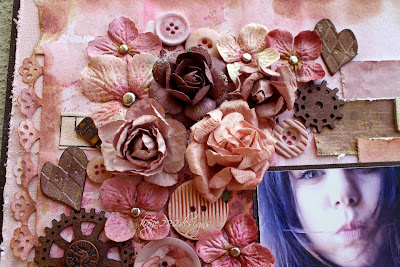
The entire background paper was white cardstock. I first cut a .25 inch around, then I punched with 3 different punches around parts of the edges. I distressed the rest of the edges with a distresser and brown ink. I actually made a brick template in paper to start my grunge. After that I stamp in pink and brown some of donna salazar's stamps "bubbles" and "my love" Next came all the flowers...I just happened to have lots of prima leftovers and lots of pink buttons that I have had forever! I just added little silver brads in the centers. 


The silver circles are paperclips that I bought at the local target. The cogs are from donna salazar and I distressed them in brown ink and I also did the same for the grungeboard hearts from tim holtz. 
The tiny clocks are from Bo Bunny and they just are perfect little pieces of metal for this lo.


I added some leftover pieces of patterned paper for the banners. The title is a soft cream letters from Prima...they are so beautiful! I also added some pieces of ruler ribbon for a touch more of cream. 


So after all the embellishments were on the layout, I took a deep breath and covered the photo with a scrap piece of paper and started spraying more tattered angels in "tea rose"
thank goodness it turned out ok! I sure would have cried!! 
Thanks for stopping by and have a super great week!
xoxo

Saturday, September 24, 2011

"Happy hOWLoween" Card

Hi
So I'm still on this Halloween card kick lately and well I wanted to use kraft cardstock for this card. I originally wanted to make a card that was more vintage, but then it took a turn to steampunk...this card is sized at 6x6. My son's bought me these stickers for my birthday this past July and so I was able to use it for my card. I also have had the chipboard and grungeboard for soooooo long now and I used a few more pieces. I used stickles silver glitter to give it bling.
The gold mesh is ribbon that i bought last Christmas and was planning on using it for holiday lo's...it came in handy for today's card because the owl is gold too! I used my cricut "Happy Hauntings" for the frame in black and my cuttlebug for a bit embossing. I also had some metal stickers and a few gems to give this card a complete look.
The card is really different than what I normally make.....hope you enjoy!
So here is a side angle to see the real gold of the sticker....so pretty IRL...
Thanks for stopping by!

Saturday, April 2, 2011

Steamy Romance *Steampunk*

This is a recent photo of my daughter and her boyfriend. They are the cutest couple and are so in love. My daughter has had a few boyfriends in the past who have not been...shall i say up to par? But, this young man is everything she wants and he adores her...young love is so perfect!

In this photo, they were dancing at a club and were a bit sweaty...hence the title "Steamy Romance" it became. So I wanted to make this a bit steampunk and yet springy for this time of year. I only used 2 pieces of white cardstock and leftover green cardstock for the papers. Everything has been stamped, distressed, masked, stitched and doodled. I love the ending result! You will be seeing more of this young couple soon....
Here are a few close-ups:
I love this metal gears by Tim Holtz...
I made this ribbon rose....and I found on line the free Steampunk font....
I just love these cool flowers and I added some grunge behind it...
Thanks for stopping by!

Sunday, January 30, 2011

Quality Time

Every year we make New Year's Resolutions. One of mine this year is to spend more "quality time" with my daughters. It seems since they have grown we dont get to spend much time together anymore...so I need to make it count more. Here is a lo I did for a steampunk challenge over at scrapbook.com. This is my second steampunk lo ever and I really like how it turned out. Grungy!
Here are some close-ups:


Thanks for stopping by!

Saturday, November 20, 2010

Chicago Steampunk

This is my very first steampunk layout that I did for a challenge at scrapbook.com.
I love the city of Chicago and my family and I go there often. It is where most of my family lives and close to where I grew up. I so miss the water....so now when we go to Chicago it is like a vacation. I took this photo a few years ago....
Here are a few close-ups....I used my cricut to make all the gears....so much cheaper than buying lots of the metal gears....plus you have the options to make them any size and color you want!


Thanks for stopping by!