Tuesday, April 17, 2012

Blessings of the Lord *CR84FN*

Well, I made another card tonight based of the CR84FN colors. They are so soft and beautiful!
The colors are: Medium Pink, Tan and Cream.
I have been using pink lately and I love the tan and cream....use it all the time!

Here is my 5 x 6 card for the color challenge.....
I used lots of beautiful prima flowers that I have been neglecting lately....It sure was super fast making this card by using them...I was so glad they matched my paper perfectly. :)

I used "Floral Ovals" from Spellbinders and the sentiment is from Heartfelt Creations called "Book Frame 2" it also has some book frames too.

Check out the details of this amazing Butterfly from Cheery Lynn Designs! WOW! So delicate!
This is a set of 3 called "Exotic Butterflies Small 2".....love them!

Have a great night!

Shabby Chic Birthday

Hi, Today I made this card using the fun sketch from Mojo Monday. I was inspired by Mary Fish using cupcakes for the circles. Thank you! I wanted to make a shabby chic cupcake card using pinks, blues and pearls.
Here is the sketch this week.

Here is my shabby chic cupcake 5 x 7 card. I used "Sweet Treats" with my cricut for the base of the cupcakes, then I used my crimper to make the cupcake liners. I embossed with "D'vine Swirls" cuttlebug for the cream frosting and added pearls, pink flowers and grey roses.
I used my new "Romantic Rectangles and cut it so be smaller so I could add the MS punch and banner on the bottom.

There are pop dots under the cupcakes and more pearls on top. The banner is Spellbinders and I printed Happy Birthday from my computer.

These cupcakes look almost good enough to eat! lol
Thanks for stopping by! Have a great day!

Sunday, April 15, 2012

Life is Good

Hello, Im sharing tonight a card that I made for the Verve Challenge this week VLV. It actually was a hard sketch for me this week...but after some thought....this is what I came up with and very happy that I used this sketch! Thank you!

Here is my card...lots of flowers from Heartfelt Creations.....Posy posy posy!

A side view....
I also bought some "Copic" markers....love them! and that is what I used to color the flowers and flower can.

You can see that I added flowers over the flowers to make it pop!

Thanks for stopping by.... hugs Lisa

Wonderful Birthday!

Hi, I wanted to share a card that I made by scraplifting Becca Feeken's beautiful card. I happened to find her blog recently and when I seen this card...i knew I wanted to make it for a birthday card. Thank you Becca!
It is pretty much the same except, I added an extra oval, different stamp sentiment, different paper and a different butterfly. I was at the scrapbook convention yesterday when I bought the beautiful Spellbinders Floral Ovals and Romantic Rectangles. OMGoodness! They are so delicate and intricate...love them! I also bought the butterfly from Cheery Lynn Designs, it is called Exotic Butterflies Small #2. They are so delicate too! Perfect for cards and scrapbooking layouts. The sentiment is from Heartfelt Creations called Inspire Me Sentiments. I used some tim holtz ink to get the perfect match to my paper.

As you can see here, I used the "Romantic rectangle for the card base. I scored .25 inch on the back of the card so it would open and also used the same patterned paper by Graphic 45 inside. When I plan on using it I will add one more piece of cream paper for my personal birthday wishes. I also added some pop dots under the small "Floral Ovals" and under the sentiment oval, which is also by spellbinders called "Classic Ovals Large"

A closer view of how detailed these Spellbinder diecuts really look. I added some cream pearls and sheer ribbon like Becca....

Hope you are inspired as much as I was....be sure to check her blog out! Stunning work!
Have a great Sunday!

Saturday, April 14, 2012

Scrapbooking Convention, Mesa AZ *Heartfelt Creations*

Hello ladies,
I wanted to share how I had such an amazing day with Heartfelt Creations today! I met Emma Lou in person again, but this time as one of their designers...woo hoo! She is such a sweetheart and for those of you who have met her, im sure you will agree. :)
I was honored to have helped today teaching classes...thanks to all of you ladies who attended them...for I hope you had fun too! We made flowers, a scrapbooking layout and fabulous cards....if you missed out this year be sure to try them in the future.
I met many wonderful ladies today and thank you for all your support for voting for me to be on the next design team. Keeping my fingers crossed.....
Be sure to check the HC blog for many wonderful designs by me and our amazing DT!
Hope I helped with making some wonderful flowers and designs today....see you soon!
Hugs
Lisa Blastick

Wednesday, April 11, 2012

Heartfelt Wednesday's NEW "Western Elements" Collection

Hello,
Welcome to the NEW "Western Elements" Collection with Heartfelt Creations!
Escape to the western plains with the Western Elements Collection. Featuring Grandpa's antique wooden carriage and super-sized mushrooms, this set will delight with a brand-new twist on a traditional theme. There are 5 new PreCut Stamp Sets and one beautiful new exclusive Spellbinders die designed for Heartfelt Creations.

Leave a comment on the HC blog by April 17 to be eligible to win the entire release valued at $109.99. The winner will be announced on April 18 on the HC Blog.


This little cowgirl is my girlfriend's daughter. She is such a doll and totally a cowgirl in training!


Here you can see the "Posy Stamps and Diecuts" plus the "Western Bronco Diecut" leaves just really go with this theme. Last month's "My Guy" Collection really goes fabulous with this addition of "Western Elements" See that amazing rope in the background...love it!

I just recently bought the "Fancy Tags 2" It is so elegant and yet you can use it for a fun rustic cowgirl theme. :)
Just check out that fence....it is perfect for the horse in the background.

Hope you will check out more ideas and examples over at the Heartfelt Creations Blog and don't forget to enter for a chance to win this NEW amazing "Western Elements" Collection!

Tuesday, April 10, 2012

There's NO Place Like Home

Hi,
Once again this evening, I was able to make another card based on Mojo Monday's # 236 sketch. As I was looking for papers, I started to think about my mother and how there is no place like home....missing her very much....
Here is the sketch by Teresa Kline....thank you!

Thinking about my mother and all the shabby chic things she loves, I used papers from K & Company and then thought about home cooking....a miss those days when we used to get together for holidays when my children were small....sigh....
So do remember all those stickers that we all start off with when we first start scrapping and cardmaking? Or still do? Well, I have soooo many just sitting in a drawer and was finally able to bring one out to use! YAY! It was perfect for the look that I was going for....

The cookie sheet and wisk are super shiny metallic paper, really gives the card a shine with all the vintage papers.

I printed up the "Missing You" and "There's NO Place Like Home" on Microsoft for Mac using two different fonts....I also used those super duper tiny cream pearls all around the card base and circle for a little extra vintage bling.

Have a great evening!!

Sunday, April 8, 2012

Unfailing Love

Happy Easter!
This evening I was able to make a card for this week's Verve's sketch at splitcoaststampers. Another amazing sketch from the talented design team....thanks again!

Here is my card...pink pink and more pink...I think Im actually starting to like the color more and more now.... :) The sentiment is from Heartfelt Creations called " Uplifting Scriptures"

I used "Lacey Ovals" from spellbinders and "Fanciful Flourish" from Cheery Lynn Designs.

The pink flowers are from Prima....had them for a long time....it was a perfect match to the papers. :)

Thanks for stopping by! Hope everyone had a great Easter!

Friday, April 6, 2012

Easter Basket #2

Hi, since Easter is coming this Sunday, I wanted to make another basket for my girlfriend at work before the weekend....she loves pink flowers and ribbon....I'm so sure she will love this little basket made with Heartfelt Creations "Decorative Layered Basket Die". This little basket is 2.75 x 3.5 inches and it is perfect for adding just a touch of candy or gift card.
It is soooo fast to make with the diecut, no need to do much except glue it together.
The side strip of paper to make the insert is in the same green cardstock is 1 inch wide by 6.5 inches long, then scored at 2.5 inches and 4 inches.

A little closer view....

The leaves are from Spellbinders "Foliage" and I embossed them and then crunched them a little bit. Glue them down and add Prima flowers. I bit of pink sheer ribbon in a bow with some green tulle for the inside and it is done! Easy and super fast....took me about 10 minutes to make. :) If you dont have this diecut for this Easter, no worries....there are many ideas for other holidays at Heartfelt Creations and there is always next year!

Hope everyone has a Great Easter with family, loved ones and friends.
Hugs

Thursday, April 5, 2012

Shabby Chic Shutters *Donna Salazar Designs*

Hi, Welcome back to my new post for Donna Salazar Designs!
So, today I am sharing with you a tutorial to make some "Shabby Chic Shutters". Distressed shutters seem to be popular right now so I decided to make them myself with Donna's amazing Corrugated Cardboard by Zutter....the best part is you can distress and ink them any color to match your layout....also did I mention....super cheap too! The cardboard that comes in the pack is 7 x 7 inches and there are 6 in a pack....which means lots and lots of shutters for a fraction of the cost!
Woo Hoo! Happy Dance!
Here is the finished layout with the Corrugated Cardboard shutters...love em! This layout is also using more of the beautiful "Spring In Bloom" and "Artistic Papers" from Donna's Salazar Designs!
This is a photo of my little Roxy, she is just Picture Perfect....youth! lol

So let's get started making those shutters! Here is what you will need:
Ruler
Pencil
Scissors
Craft Knife

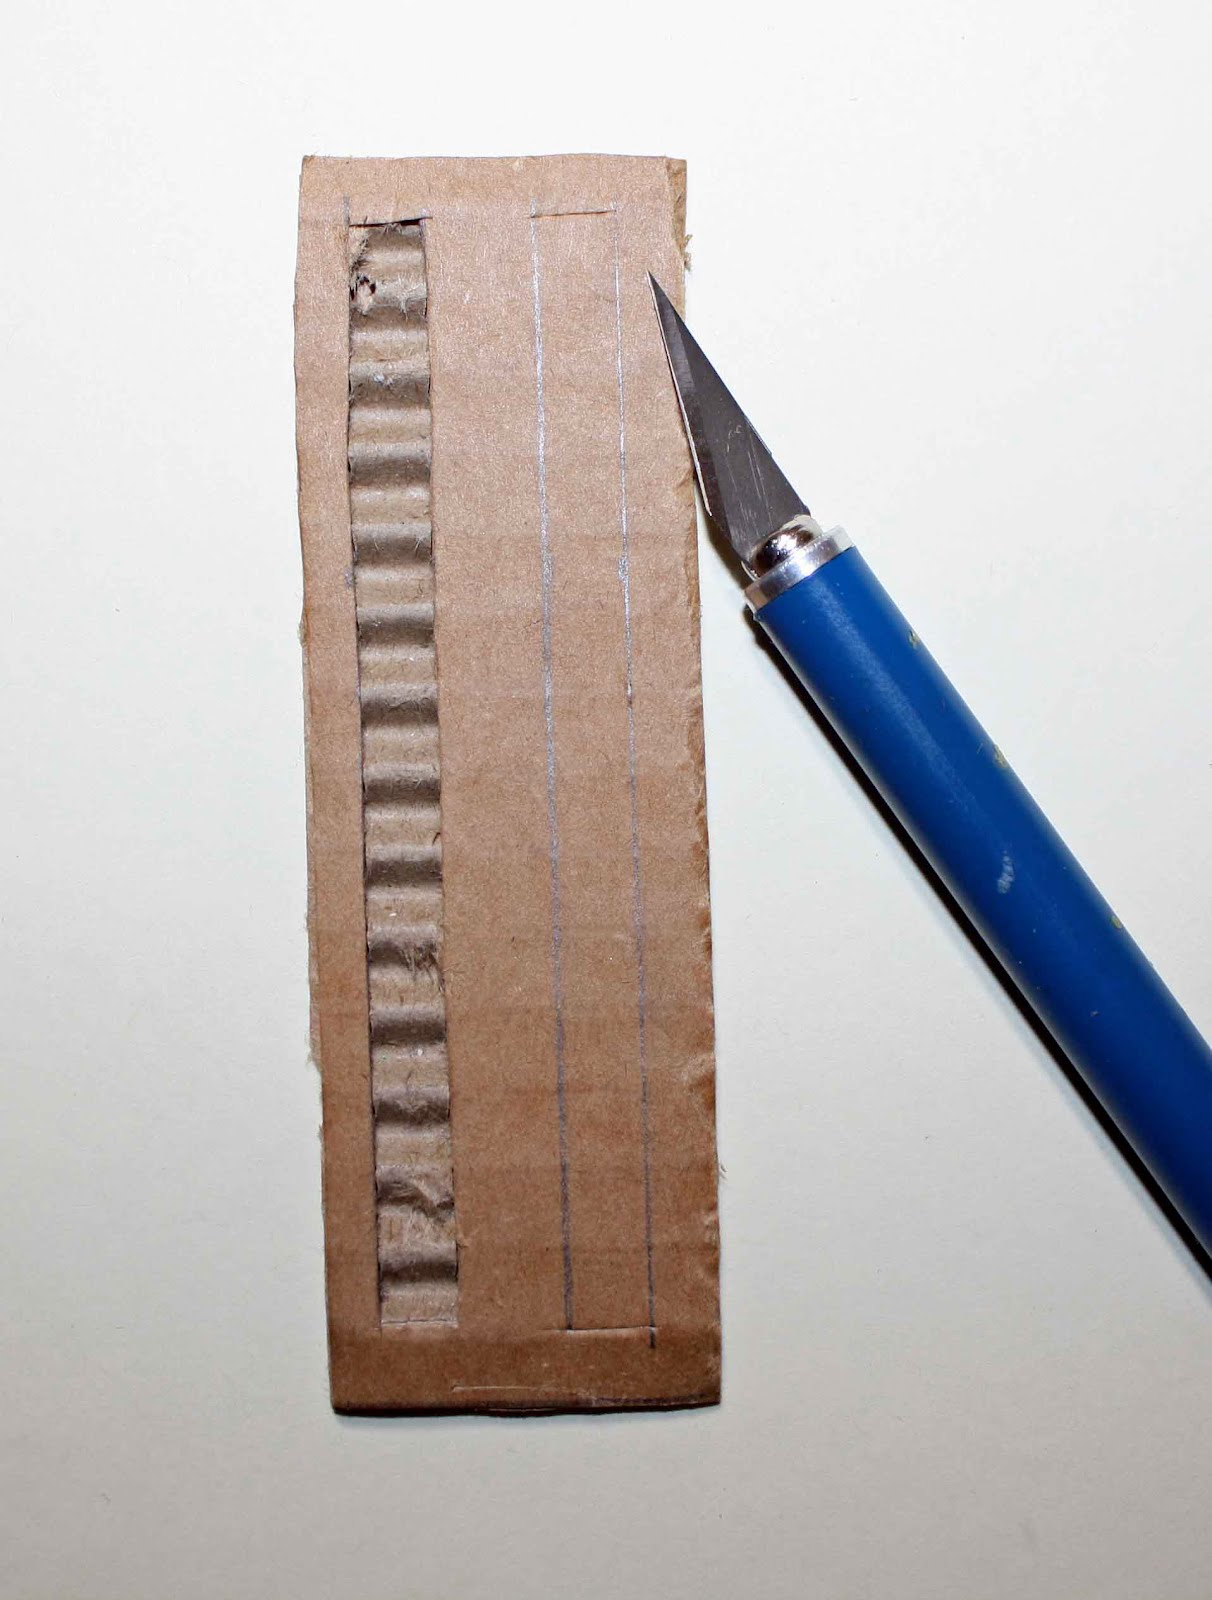
First measure and cut out a 1.25 inch x 4 inch piece of cardboard...*Hint* Be sure to look at the way the cardboard grooves go on the edge....you want the centers to look like shutters. :)

Next, measure and draw lines in pencil at .125, .25, .625, .75, inches.

Then using a sharp #11 craft knife, cut on the lines on both sections.

Last, but not least use your favorite Donna Salazar Mix'd Media Inx...I used "Honey" it gives a bit of color and yet shows the shabby part of the cardboard through.

Here is another closer view of the finished shutter on the layout....I added a heart cut at 1 inch, used a small punch for the edges, crimped and crinkled the heart, then added a small cream ribbon for the center. That's it!

I just love the "Shadow Flowers" and I punched out tiny flowers with left over scraps from the "Artistic Papers" It has little polka dots on it...plus, I tend to use every piece of scrap I have...lol
I don't journal as much as I should, so I wanted to add something on this layout. I used a quote from "Great Inspirational Quotes" It reads:

"A daughter is the happy memories
of the past,
the joyful moments
of the present,
and the hope & promise
of the future."
Author Unknown

I added:
In my eyes
you are....
Picture Perfect

I used Donn's Salazar's "Carnation Creations" to make my flowers and curled some and crimped the others. For the title, I used "Artistic Papers" and printed on my computer with Microsoft for Mac in purple ink.

Products Used:


SPELLBINDERS

CLEARSNAP

Zutter

I hope you enjoyed my tutorial for "Shabby Chic Shutters" You will love them too! Be sure to always come back to see more fantastic designs and tutorials from our fabulous DT at Donna Salazar's Blog!
Have a great day!