Showing posts with label GCD Studios. Show all posts

Thursday, February 21, 2013

Blue Jeans *Donna Salazar*

Hi my scrappy friends!
Its Lisa today sharing a tutorial on how to make felt roses. It really is easy using Donna's "Bitty Blossoms". Felt flowers seem to in lately and buying your own felt makes it not only convenient but also super cheap! Here is my layout using the amazing Family Jeans Paper Collection. This is a photo of my little Roxy and in her blue jeans.


Here is a closer view of the blue felt roses. 


First, take a piece of felt and cut it to fit your diecut machine. 
I bought my felt at Michael's full price for 20 cents! lol


Using the largest of Bitty Blossoms...Run it through the diecut machine a few times. 
If it sticks a bit just cut edges with scissors. You should see the lines. 


The biggest part of making these flowers is applying the glue all the way around before you start rolling them. I use a fast drying glue like Art Glitter-Clear. The roll the edges like you do with paper, I also use a wooden stick in the center and then pull it out when Im done.


Ta Da! Your felt flower is done! 


Another view of the felt flower and layering of a yellow rose using 3 layers. 


Gotta LOVE the chippie letters in this "Family Jeans" collection.


An angled view of the dimensions of the flowers and pop dots throughout.


Hope you enjoyed and start making your own felt flowers too...
I just love when I can save some money to spend it somewhere else. :)
Have a great day! 
xoxo

Products Used:

GCD Studios-Family Jeans Collection
GCD Studios- Family Jeans- Chipboard Alphas


Saturday, January 5, 2013

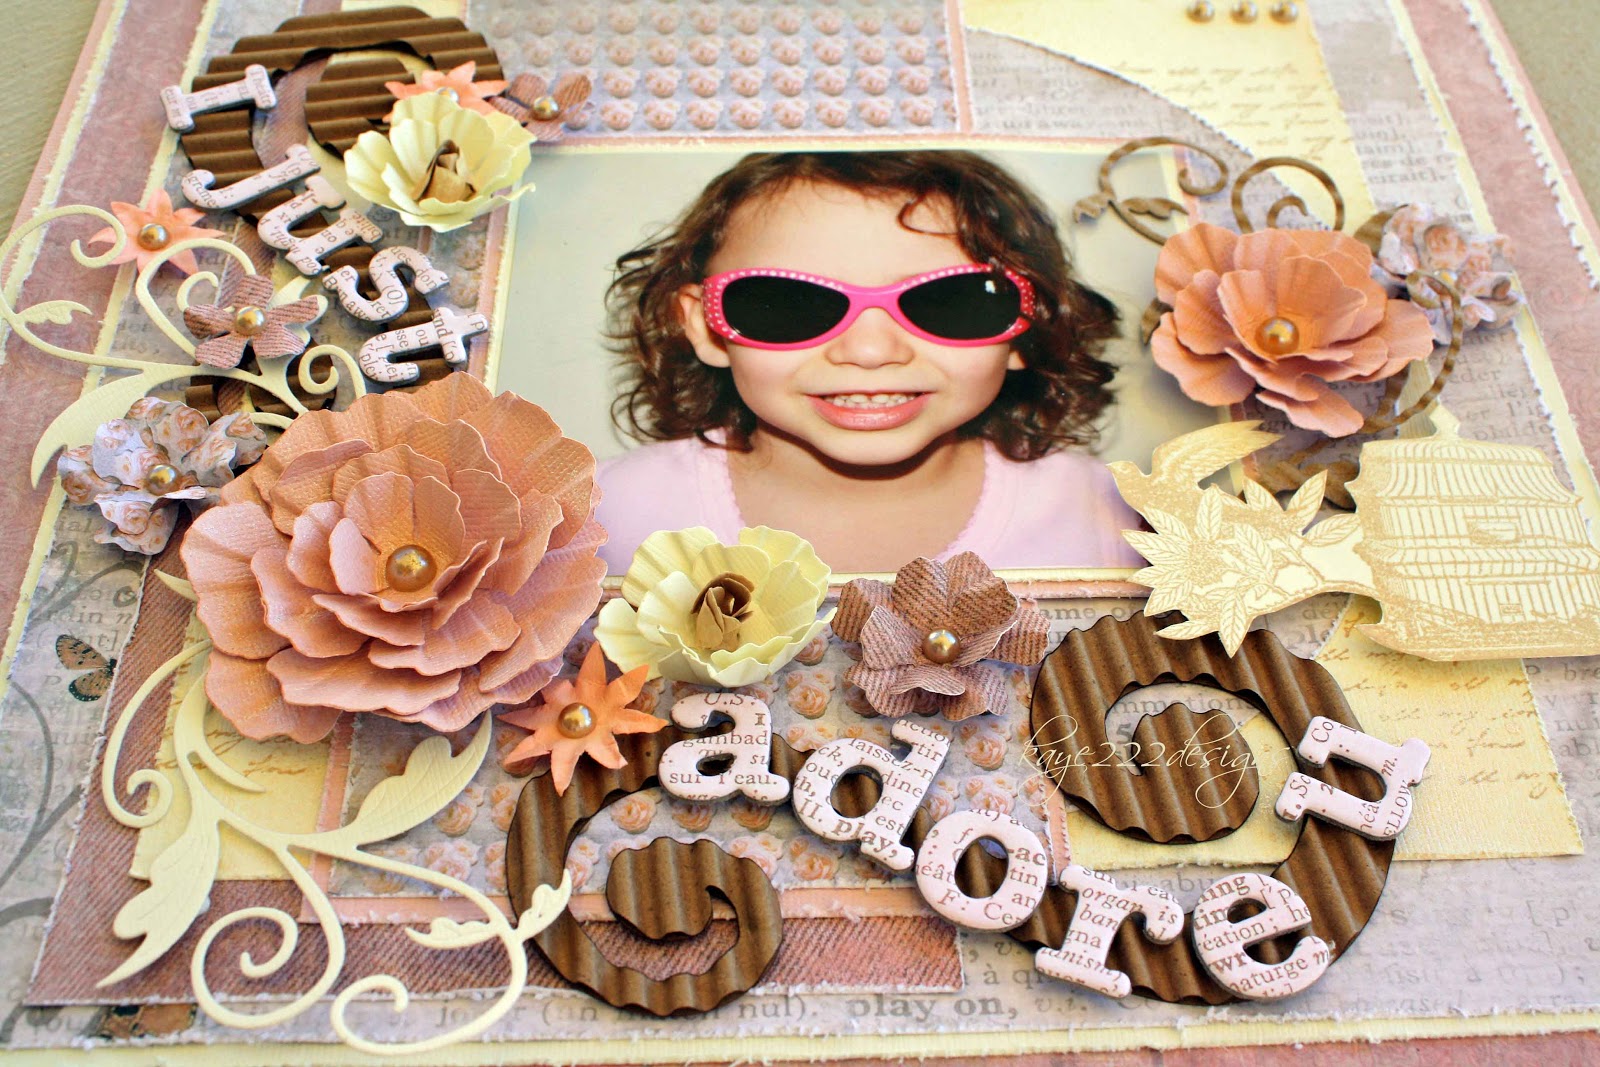
I Just Adore You *Donna Salazar NEW Natural Beauty Collection*

Hello everyone! I sure hope you had a Happy New Year! 
It's Lisa back with some fabulous new layouts and cards for the upcoming month's ahead.
Today, I am sharing with you a new layout that you might see at the upcoming CHA this month.
I used Donna Salazar's BEAUTIFUL new line of papers called "Natural Beauty" by GCD Studios.
Let me tell you....these papers are really AMAZING!!!
They are so soft and delicate but also have Donna's fabulous touch with denim and wood backgrounds. 
This is a photo of my adorable little niece, Emma. She is such a doll! When I took this photo of her I was visiting my brother's New baby twin sons. Twins run in our family...I have them too :)
So as I was taking photos of the boys, my little Emma jumped in front of the camera and said to me...
"Auntie Lisa, take my picture too"...lol... kids say the cutest things :)


I used Want 2 Scrap corrugated swirls and the chipboard letters from the "natural beauty" collection.
I really like the size of these letters and they fit great right over the top of the swirls.
The birdcage was fussy cut out and it is a stamp called "Free As A Bird". It was stamped on cream cardstock with Donna's NEW Mix'd Media Chox-Driftwood. I also stamped on the cream background making my own paper using "All My Love"


I made lots of flowers using "Rose Creations" As you can see, you can curl them or crimp them to get different looks. Also a little bit closer view of the beautiful letters. 


A 3D view of the flowers and cardboard pieces. It pops off the page just the right amount. :) 


I'm so glad you stopped by and be sure to be looking for lots of new projects using Donna's NEW line of papers, because there are 3 of them!!! Yes 3!!! So exciting!!
Have a great New Year...
xoxo

Products Used:


Wednesday, December 19, 2012

Proud Of You! *Donna Salazar*

Hi, Its Lisa once again this month sharing with you a 
New Layout of my daughter and my mother this past spring 
during my daughter's 2012 College Graduation. 
Im soooo Proud Of You! 
Recently, I seemed to have lost my mojo for layouts 
but it came easy this time using the great papers 
that matched my daughter's cap and gown from ASU 
from the Botanique Collection and fun swirls matching the background by Donna. 


Here you can see the beautiful roses from "bitty blossoms" and "rose creations" 
they really go great with the patterned papers that have roses printed on them. 
Loving the swirls huh? me too!


I used some left over sprockets that I had from another project and I fussy cut out the roses with harps. 
The sentiments are on the "botanique paper" and I used my fancy tags to cut them out. 


Here you can see a 3D view of the layering. Lots of distressed edges and 
I also used my crimper to match the awesome swirls too. :)


Hope you enjoyed my layout for I really am proud to scrap this photo
of my daughter and my mother....to me it is priceless. 
Have a great Holiday Season and see you next year!
Hugs 
xoxo

Products Used:

Crafty Chronicle- Younique

Monday, November 5, 2012

Great Friends *Donna Salazar*

Hello my scrappy friends! 
Its Lisa back with a new 8.6 x 11 inch layout featuring Michelle and her great friend Debbie that she recently visited. Such a great photo to cherish! 
I was in a pink mood today and Im so glad it came together exactly how I imagined it. 
Love when that happens!
I used some of Donna's NEW fabulous chippies and LOVE the new swirl stamp! 
They really compliment each other so well as you can see. :)


I did some fussy cutting of flowers and blended them in the rest of the flowers. 
I also had to use my favorite roses "bitty blossoms" and "rose creations" 
All the chippy swirls and stamped swirls are inked with 
"chiffon" mixd media inx and embossing powder. 


I didnt have layer too much because the papers are really beautiful the grey and pinks work so well together but I did sneak a little bit of "chronicles" behind the photo. 


I hope Michelle likes it and I really had fun with all the pinks today! 
Have a great week
hugs
xoxo

Products Used:


Sunday, August 19, 2012

Girlie Grungy Art

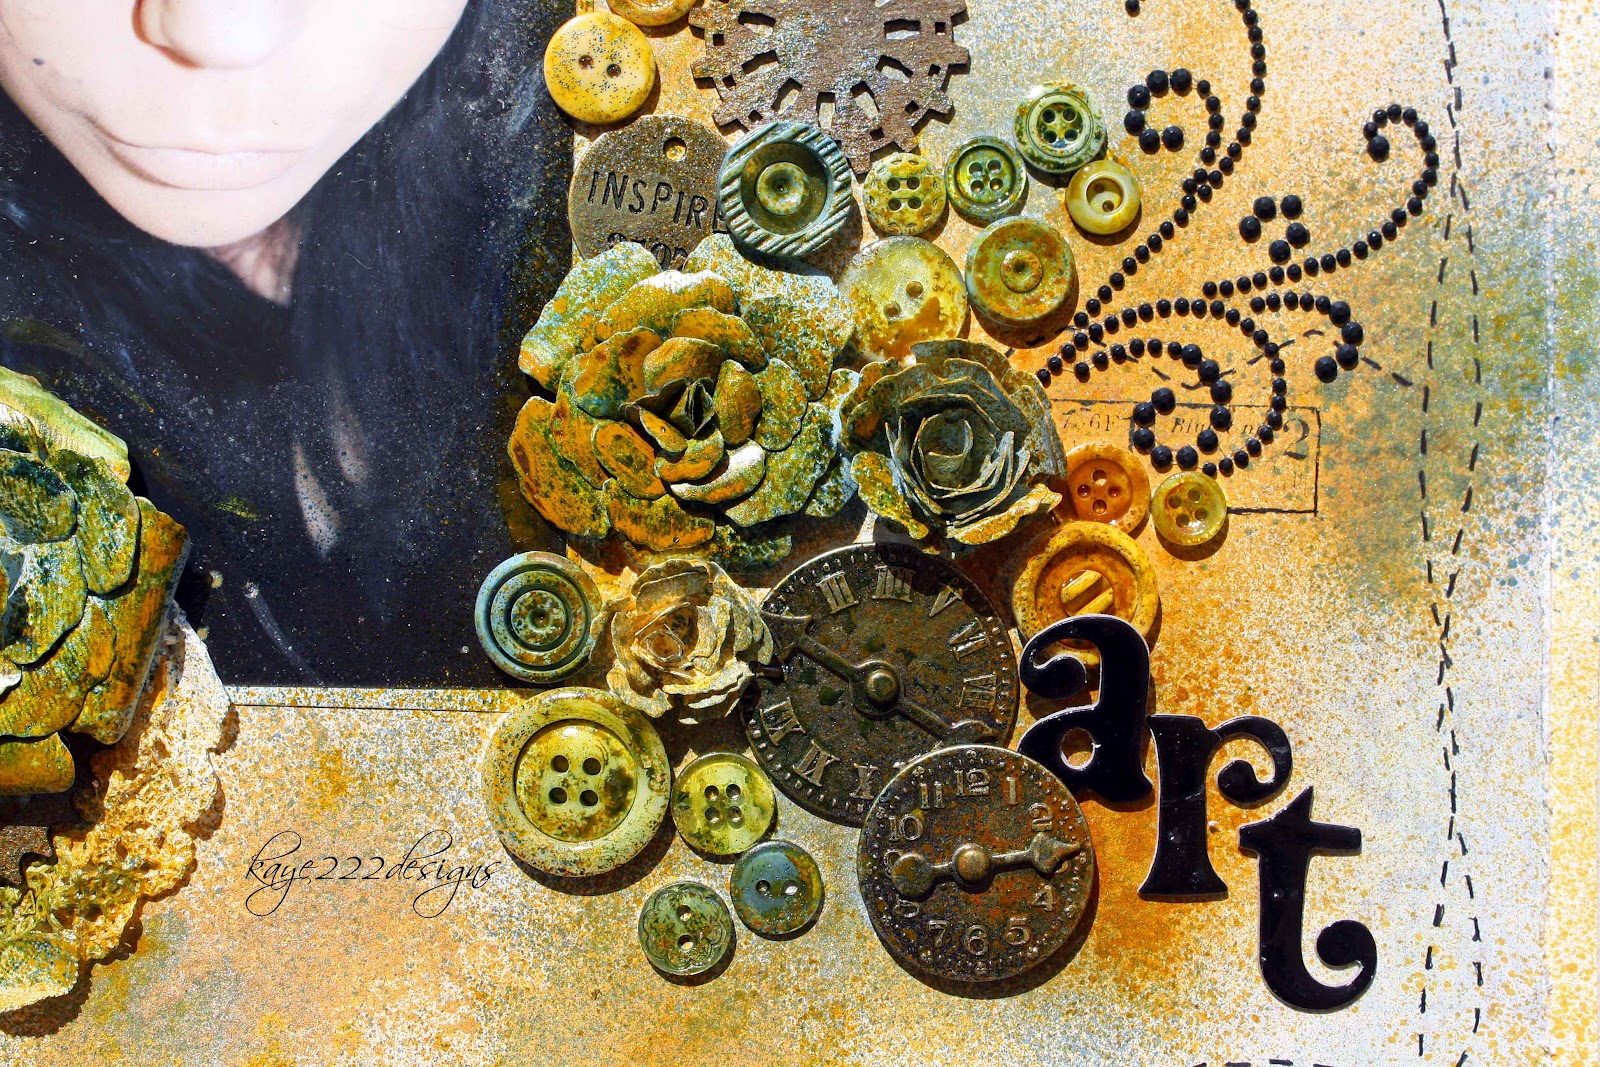
Hello Grungy girlies! It's Lisa back today and I'm sharing with you a really grungy layout with a tutorial too! I usually don't make these types of layouts because I'm always afraid it will be a disaster! Meaning the colors wont come out right or the misting will be out of place? Anyone else have that fear? If so I can totally relate :) Let me tell you that once you give it a whirl, you will be in love too! My inspiration come from the famous Finnabair and her amazing artwork. By using Donna's fabulous products you can easily get the same look with no problem. So here is my grungy art layout using 3 different mists, 2 glitters and a lot more goodies from Donna! This is an older picture of Roxy and with that dark eye shadow it thought it would work really great with the look I was going for today. 


So lets get started....
First, pick out a piece of patterned paper from the Botanique Collection and cut a .25 inch all around the paper. Then distress edges with Zutter Distrezz It All. Layer over some plain cream cardstock and doodle on the edges some faux stitches


Next, place matted photo off to the left of the page and slightly down the middle. 
Stamp Donna's ruler over  the top of the photo and place doilies in opposite corners. 
Both Doilies are small ones and cut one in half...save for another project. :) I misted the doilies slightly ahead of time with Pralines & Cream" but you really dont have too because it will get covered later.


Next, make lots of paper flowers using Bitty Blossoms and Rose Creations in 2 different shades of blue and cream to match your background paper. Ink in brown the Sprockets from Want 2 Scrap.  There are 4 pieces in the pack, I torn apart the largest sprocket to get 6 pieces, but I only used 5 of them for this project. Be sure to save the largest piece for yet another project...


Place flowers and sprockets where ever you like, I also added buttons and metal fixtures.
Once you have it all glued down, place a piece of tissue paper over the main part of the photo. It is ok to leave a little bit of the edge of the photo showing to blend all the colors together. 
OK, here comes the grungy part! :) Just start misting in spots everywhere...


I chose Pralines & Cream first, then Sea Breeze, and finally topped off with Candle Glow.
There really is no special technique to mist, just started misting in spots until you like the colors.
(I actually went back and forth with colors until it was darker in some areas) 
You can then air dry it or speed it up a bit by using a embossing heating tool.
Once it is dry add some smooch glitz on the flowers and buttons.


Im sooooo sorry...I forgot to take an original picture while I was misting...I was a bit inked up at the time....but here is an example of how i started....


After everything is completely dry add some Want 2 Scrap black bling and a title in black. 


I also used some more stamps from Donna called "Banner and Words". I diecut a small oval in cream and stamped "Believe" in black. This was placed before I misted. 


More stamps from Banner and Words. These I stamped after everything was dried. 
I also re-doodled in black the stitches to make them a bit darker. 
Check out the button...it sure is grungy! It actually looks sticky, but it is dry as a bone! 


Can you believe this is the same plain blue rose? 


Well, I hope you are inspired to try your first grungy art piece too. 
It really was fun to jump out there and try something new, dont be scared like me! lol
For a chance to win some goodies from Donna...be sure to stop over HERE.
Have a great day....hugs

Products Used:


Thursday, July 19, 2012

Timeless *Donna Salazar*

Good Morning my scrappy friends! 
It's Lisa once again sharing with you a shabby chic, fairy tale layout made for one of my amazing DT girls. If you have been following Donna's Salazar's Blog, then you probably know that Donna had this great idea to exchange photos with each other every month for the next 6 months. In the end, we will have our own scrapbook with lots of wonderful artwork from each person...how exciting is that! I cant wait to give and receive some artwork that I will treasure forever!
So my first picture is from Mandy Harrell. It is her little girl and she is such a super doll! She was looking like a princess to me with that adorable smile and wearing a pink tulle skirt. I originally, was going to title it "enchanting" since the design is in a fairy tale type theme....but when I spoke to Mandy for a little input for a title and journaling, she told me that this was a rare photo in time because her daughter was so calm in this photo and usually she is wild with a little dirty face...lol....so that is when I decided to title it "Timeless" :)


Here you can see a closer view of the "Floral Oval" mirror that I made out of corrugated board from Donna. It is really pretty IRL. I ran the floral oval diecut several times through the machine since it has so many intricate details, then I inked it with my favorite white ink "Mix'd Media Inx- Jasmine" and embossed it with "Jasmine Embossing Powder". I diecut an oval with silver cardstock to resemble a mirror and framed it with dusty pink paper. On top of the mirror is a "Fancy Tag 2" cut in white and cream cardstock with the title and journaling. 


I wanted a vintage type flower in lace but I didn't have one.....so I just made one and placed a crystal brad in the center. The little clock for my timeless theme is just a clipart clock ran through the computer. I also made a new kind of rose in pink and added lots on "Fairy Dust Glitter- Sugar Shimmer" I really love how it gives lots of bling to a flower. 


Lots of fun Donna products here! 
The "Bitty Blossoms" are just my favorite thing to make lately...I tell you if you don't have them it sure is a great investment....I can stop making them and neither will you! lol I used more "Mix'd Media Inx" in Jasmine on the flourish chipboard by Want 2 Scrap, but I also used the "Chiffon" Mix'd Media Inx on the light pink flower. It was originally in white. I made my own background paper using "Pralines & Cream" Smooch on the cream cardstock with a swirl mask. The pink cardstock is stamped with "Stanza" music and embossed using more "Mixd Media Inx" Vintage and "Embossing Powder" in Honey. This is also the same colors for the leaves too. All the bling is from Want 2 Scrap, I cut up one of the bling into 3 pieces. 


A 3D view with a reflection of the mirror and even the photo....lol 
The lace skirt under the mirror is a doily, I cut the center out and then I cut it in half with folds. 


So, I hope you enjoyed my project today....but I REALLY hope Mandy likes it! 
Have a Great Day! 
Hugs!!

Products:


Saturday, May 19, 2012

A Little "Bitty" Shabby

Hi! Today I wanted to share my tips of how I make my "Bitty Blossoms". They are easy and fast to make and are just awesome for any card or scrapbooking page. Lately, I have been redecorating my guest room in "shabby chic" so it has been on my mind a lot! Hence my latest scrapbooking page using lots of Donna's amazing products!


Here you can see how they really pop off the page.


I loved embossing the chipboard and making my own shabby cardboard circle....tutorial coming soon! 
Here is all you need to make these fabulous "Bitty" Flowers:
Spellbinders- Bitty Blossoms
Wooden Skewer
Fine Tweezer

First, I diecut out in white one of the blossoms. 

Here I used the wooden skewer to keep the center tight and perfectly round


Place glue on the center circle and use tweezers to hold down center...thats it! 


 It doesn't get any easier than that.... :)
Hope you give them a try soon...you will sure love em! 
Have a wonderful day! 

Products Used:


Saturday, May 5, 2012

You Are Amazing! ATC *Donna Salazar*

Hi, I wanted to share with you today my very FIRST ATC (Artist Trading Card)! 
Let me tell you I was a bit scared about making one because I have seen so many beautiful cards made in the past...but it was soooo super easy and fast with Donna's products! Seriously! 
I am so used to a giant 12 x 12 palette and I was thinking that there is NO WAY I can make a cute and fun ATC....gee was I totally wrong.....lol


 Here is another look..looking straight at you! 
I wanted my ATC to look like a pillow, so I added some cream vintage lace to the back of the 
"Designer Embellies" 


 As you can see here it really has lots of dimension to this small ATC. Can you see the awesome "fairy dust"? Its completely over the "crown" and in spots over the "rose"...I really love it....it gives it a great sparkle to any project you make. :)


By just adding some small scraps of kraft cardstock, you can have an entire saying on this adorable 2.5 x 3.5 ATC. Super fast and super fun to give to your friends or scrapbooking pals.


Products:

Thanks for stopping by and all the lovely comments! 
If you haven't tried one of these fun ATC's I totally recommend that you do! 
Have fun! 
xoxo